These are the lecture notes for FAU’s YouTube Lecture “Medical Engineering“. This is a full transcript of the lecture video & matching slides. We hope, you enjoy this as much as the videos. Of course, this transcript was created with deep learning techniques largely automatically and only minor manual modifications were performed. Try it yourself! If you spot mistakes, please let us know!
Welcome back to Medical Engineering. Today we want to talk a little bit about the topic of microscopy. We actually split this up into two videos. In the first one, we will talk about the fundamentals of optics and how magnification works. In the second one, we want to talk a bit about the contrast mechanisms that we can use in order to generate images in microscopy. So I am looking forward to discussing microscopy with you guys.
So here we are imaging microscopy. Okay so let’s have a look at what I’ve got for you. So this is the outline of today’s talk. We will have first a view into the thin lens model. This is then followed by the compound microscope and then we want to talk about the contrast mechanisms. This will be covered in the next video. This will be ranging from bright-field microscopy to fluorescence mechanisms, phase contrast. Then we also want to talk a little bit about the limitations of microscopy. So how far can we actually go in terms of resolution and where are the limits of microscopy.
Okay so let’s go a bit ahead and talk about the thin lens model.
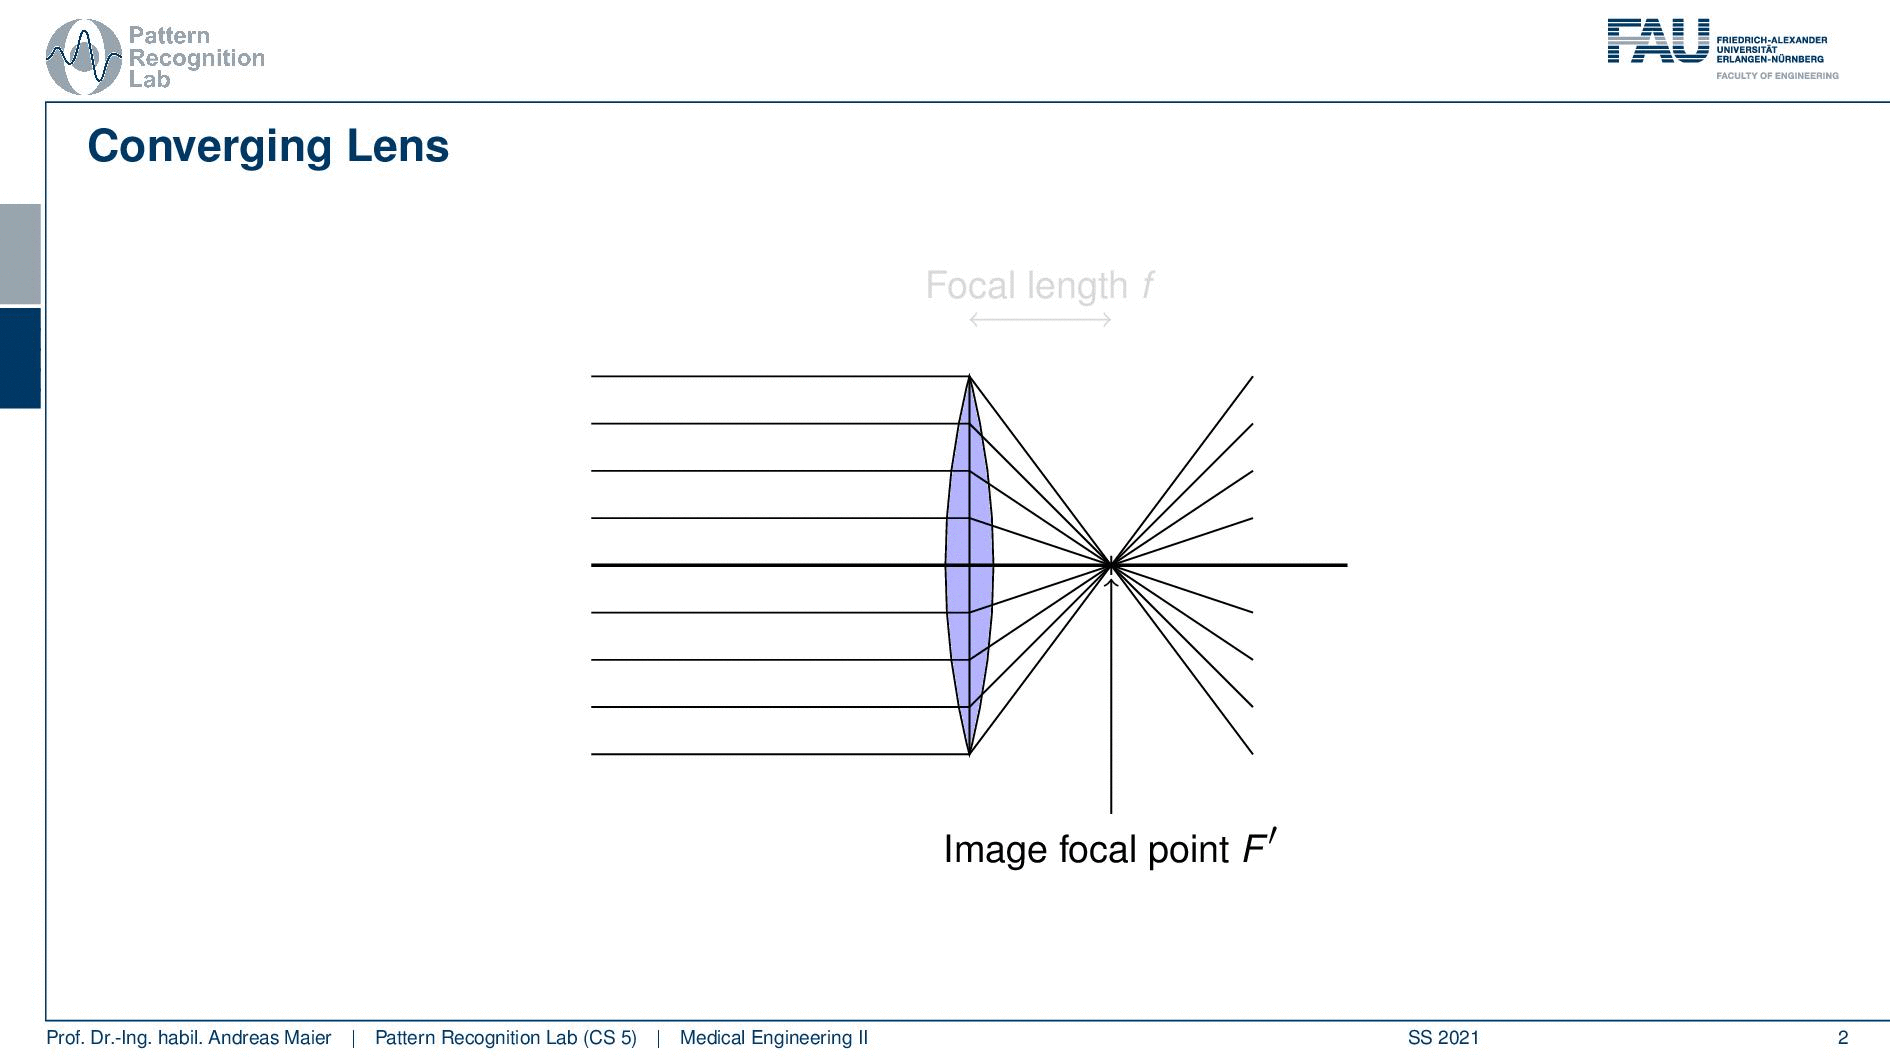
So this is a lens and now you see a converging lens and when I hit the lens with different arrays of light the following effects will occur. So you see that if I have parallel rays and they actually reach our lens then they get focused into one focal point. So all of the parallel rays, they are intersecting at a certain point and this is called the focal point. The focal point is of course in the center of the lens and its depth is located here with a focal length F. So F will be quite important when we discuss magnification. So please memorize this and also see that with capital F we are actually indicating the focal point.
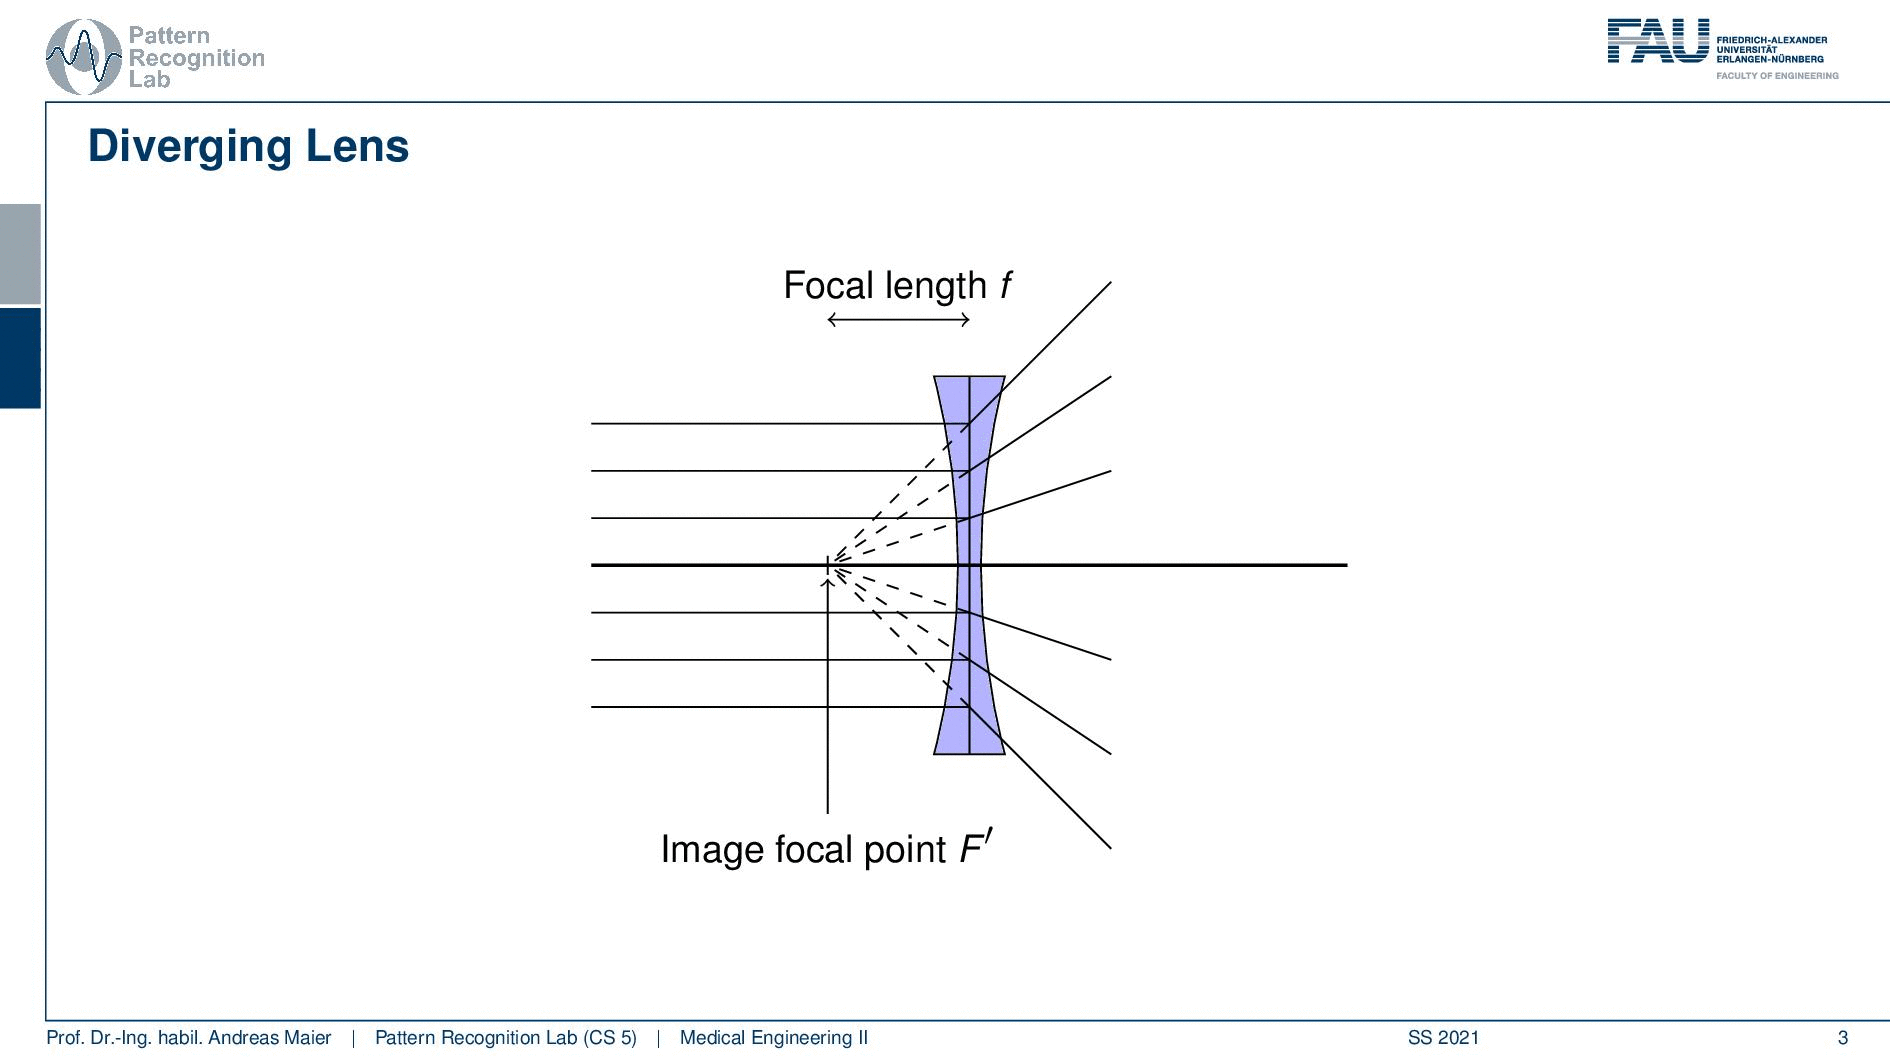
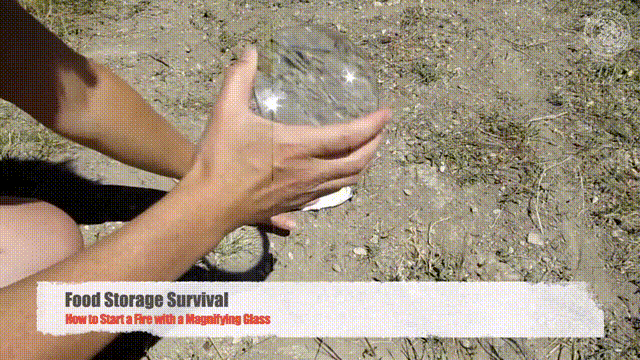
Okay so let’s see what we can do with a diverging lens. In a diverging lens, we don’t have a focal point because all of the rays they’re essentially steered into other directions. So you see here that the parallel rays diverge so they move away from the lens. But still, you can find something that is quite similar to a focal point. Here you see that they virtually all intersect in one point here and this is then essentially an equivalent to a focal point. But this is the case for the diverging lens. So also in the scenario, we can define a focal length. So you see we have two different types of lenses and if you look at those two lenses then you can already realize that if you have a diverging lens you will have a very hard time trying to start a fire for example at the campsite. So you need a converging lens because only then the light is really concentrated onto a single point such that you would be able to start a fire. So bad news for people that are short-sighted if you have such glasses you will not be able to start a fire at the campsite.
So just that you know these are the typical lenses that we use when we are discussing optics. We will see that we can use them in terms of microscopy.
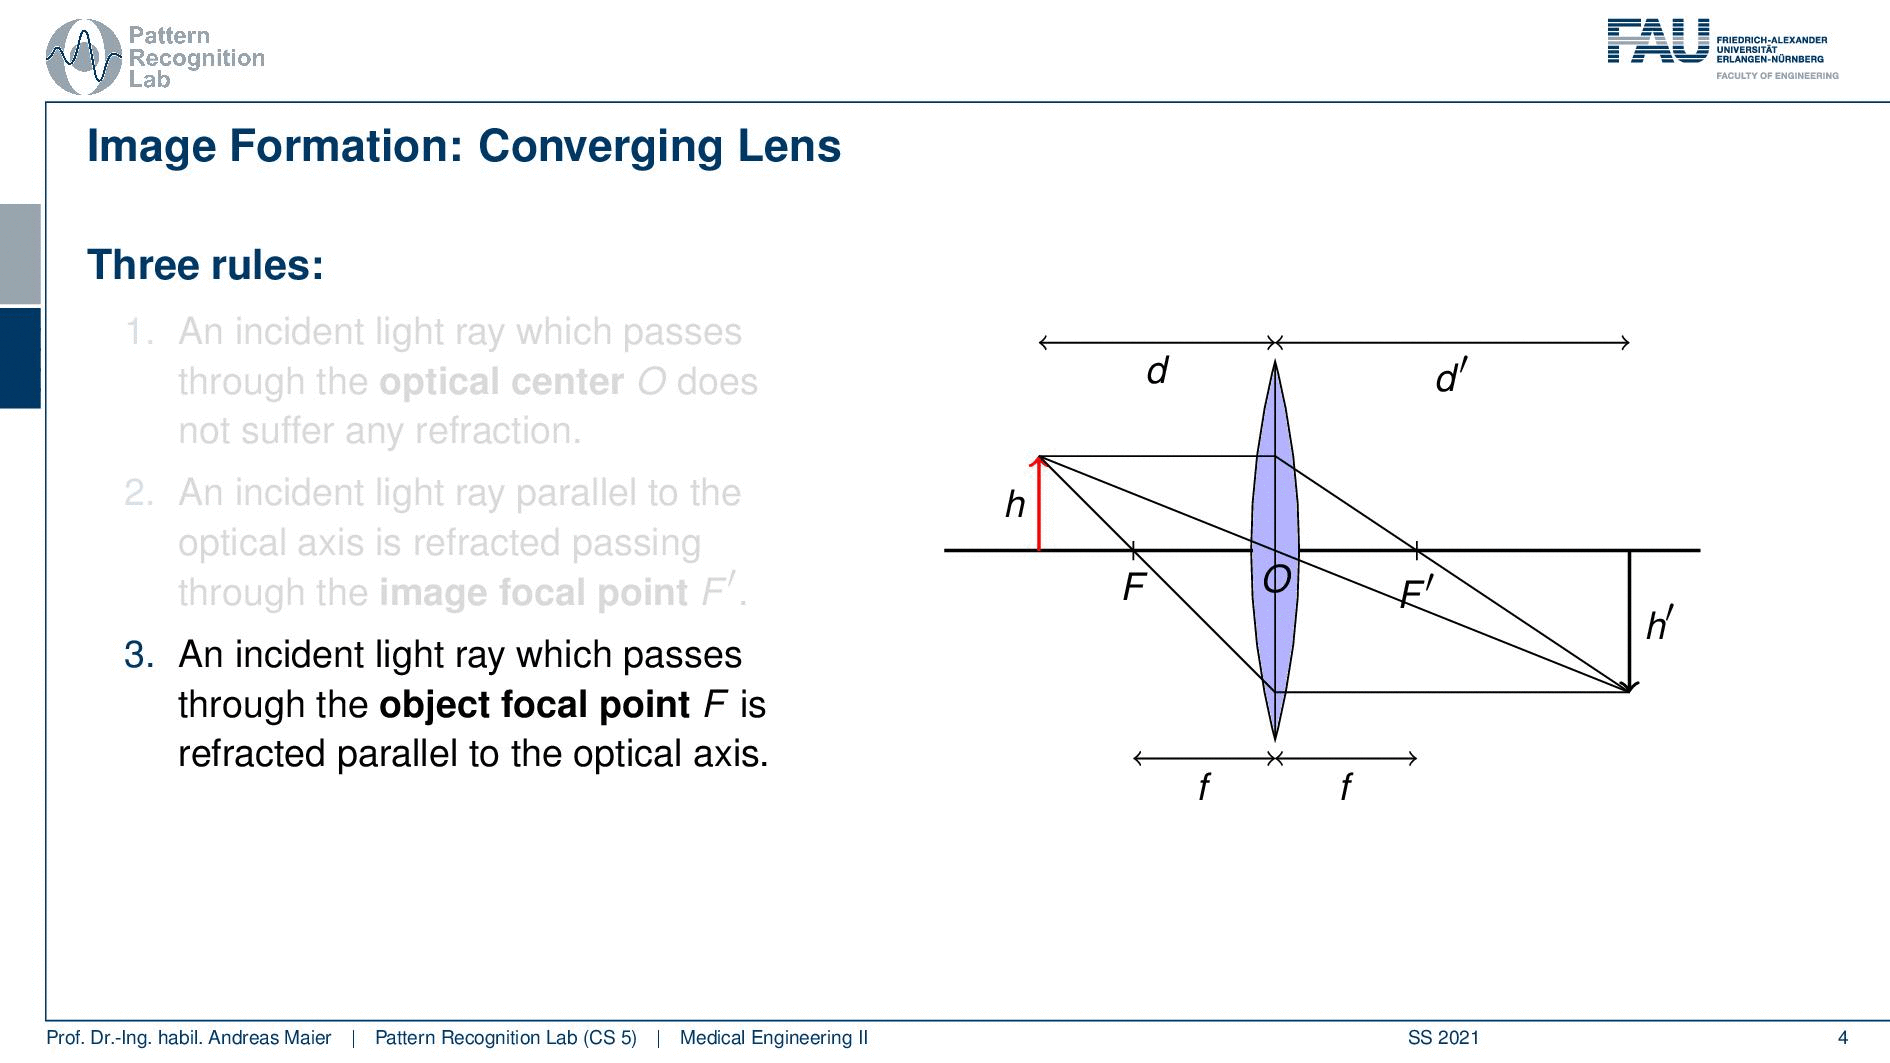
Okay so let’s move on a little bit. So we can see that we can boil this down to three rules and what we need for that is that we define a length d. So this is the distance between the lens and our object here we indicate the height of the object with h. Now an incident ray that passes through the optical center O does not suffer from any refraction. So the optical center is the center of the lens if you have a ray that runs straight through the optical center it will not undergo any refraction. Then an incident ray that is parallel to the optical axis is refracted such that it runs exactly through the focal point F. So you can see that here for the case of the parallel beam it will be directed exactly to the focal center. If you have a ray that passes through the focal point on the object side as indicated here, you will see that once it hits our lens it will be rerouted into a parallel beam. So this is quite interesting. You see that when we apply those three rules then all of these three points actually intersect. You can now see that the image that is generated by our lens now is sharp at a certain position and this is given here as d’. So in d’ you can see the object on the other side again at very sharp conditions because all of the rays intersect. You can see that now we have a height h’ and obviously the values of d, d’, h, and h’ are related to each other. If we know how to calculate those numbers then we will be able to compute the magnification factors and the distances that are associated with a particular lens.
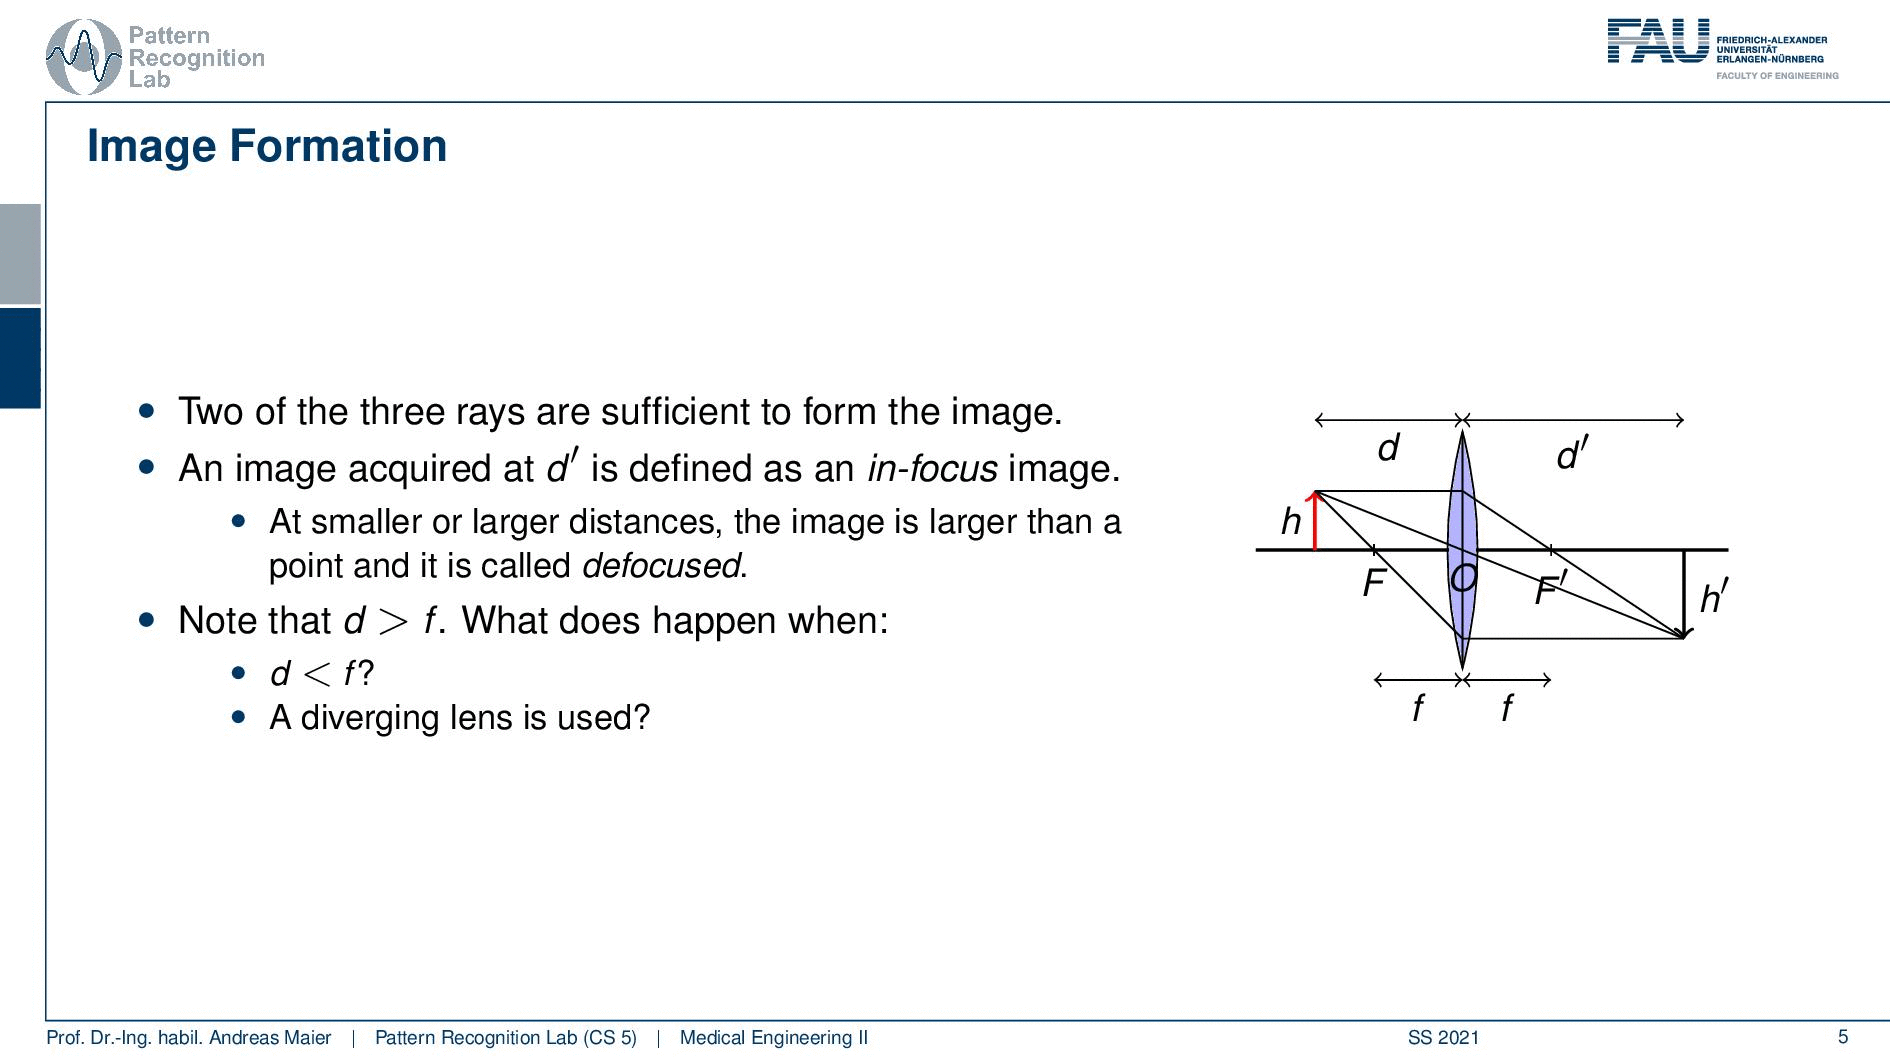
So let’s see what we can do with that well two of the three rays are actually sufficient to form the image. So we can actually get rid of one of the free rays if we want to set up the respective system of equations. Then we can see that an image acquired at d’ is defined as in focus. If you acquire the image at a different distance so it could be smaller or larger the image will be larger than a point and it will be called defocused. So not all of the rays would then intersect in just a single point. So they would intersect in a certain area and the farther you away here actually from d’ more unsharp the image would get so you get a blurred image that is then defocused. Also, note that in this case d is greater than F. Now we can also think about cases that would happen if d would be smaller than our focal length F and if we had a diverging lens. So these are actually interesting constellations and we can also have a look at them.
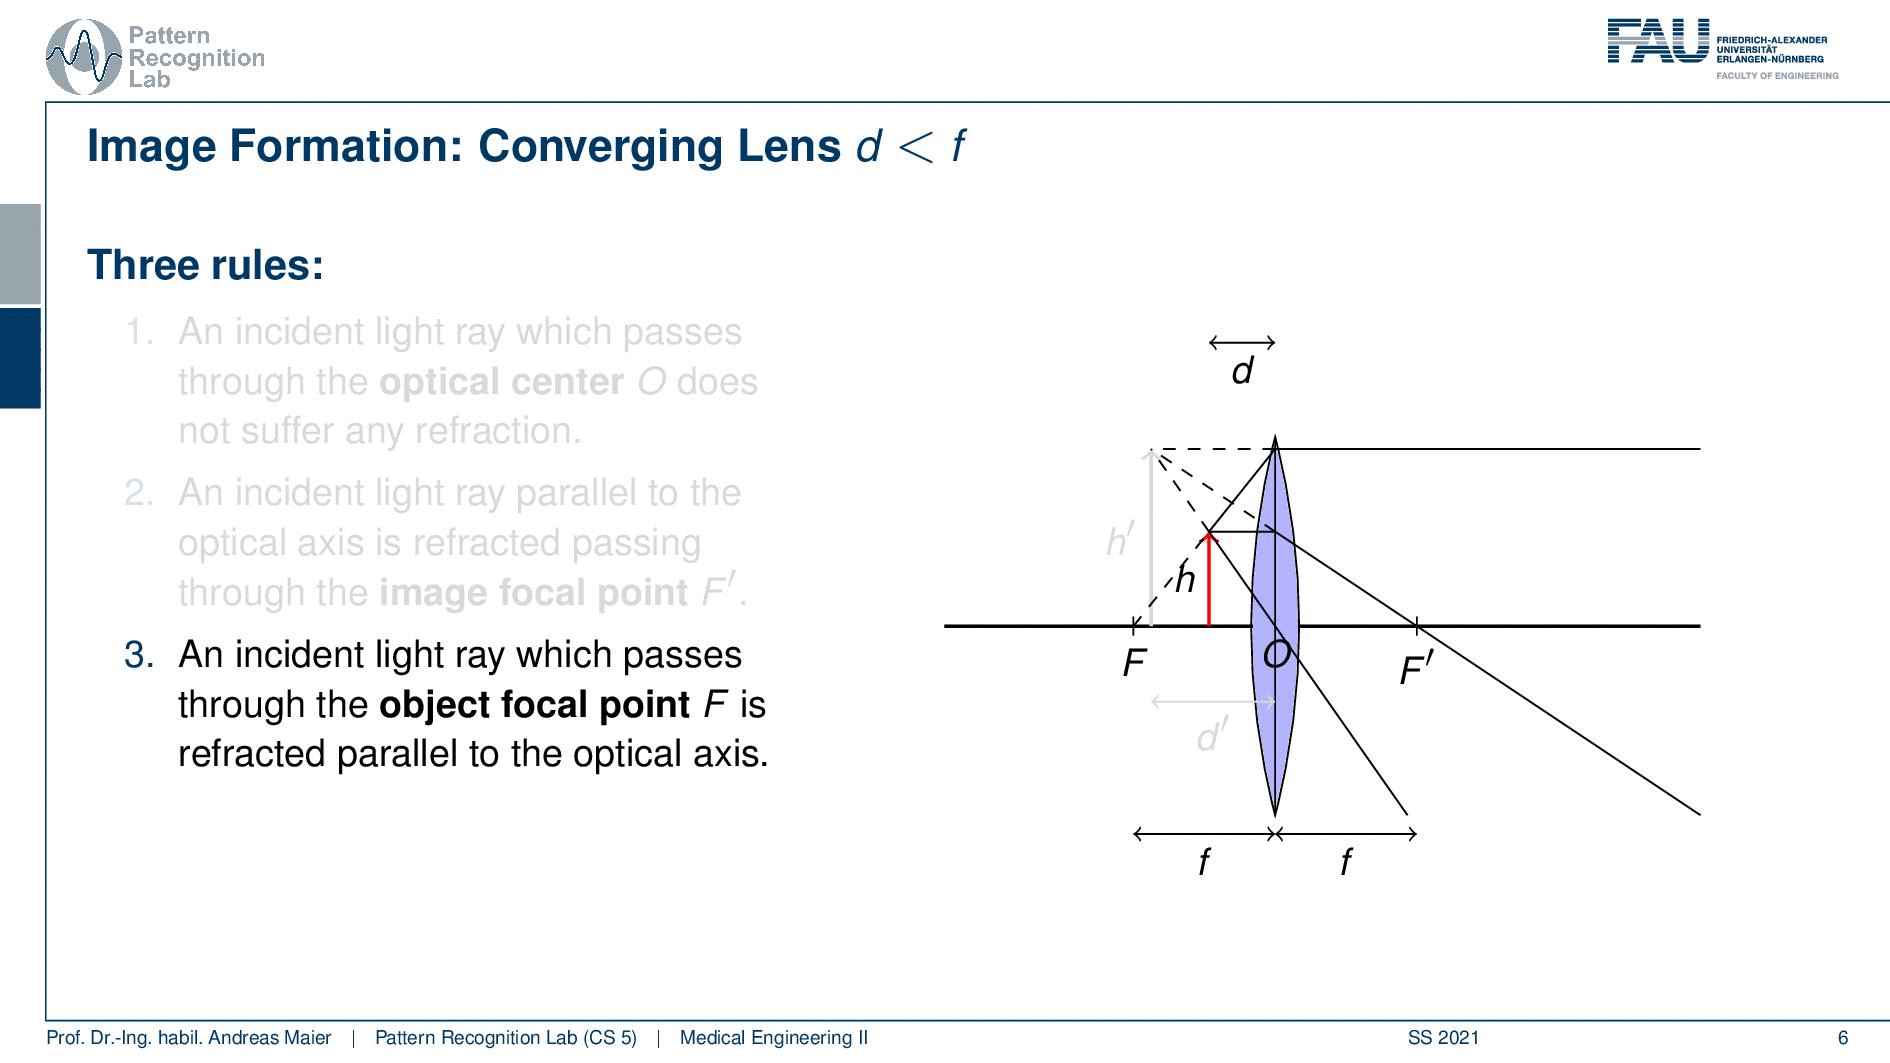
Now let’s look at the case if d is smaller than F so then we are very close to our objective lens. In this case, we also have the rules array that is intent and passes through the optical center does not suffer from any refraction. An incident that is parallel to the optical axis is refracted such that it passes through the image focal point. So the focal point on the other side of the lens. An incident ray which passes through the object focal point. So the focal point on the object side is refracted parallel to the optical axis. So you see that we have this constellation here and it looks like that all of these three rays go into completely different directions right? But if we extend them on the object side you can see that they intersect and they actually form a height h’. You can see that in this case, we have a magnification from h to h’.
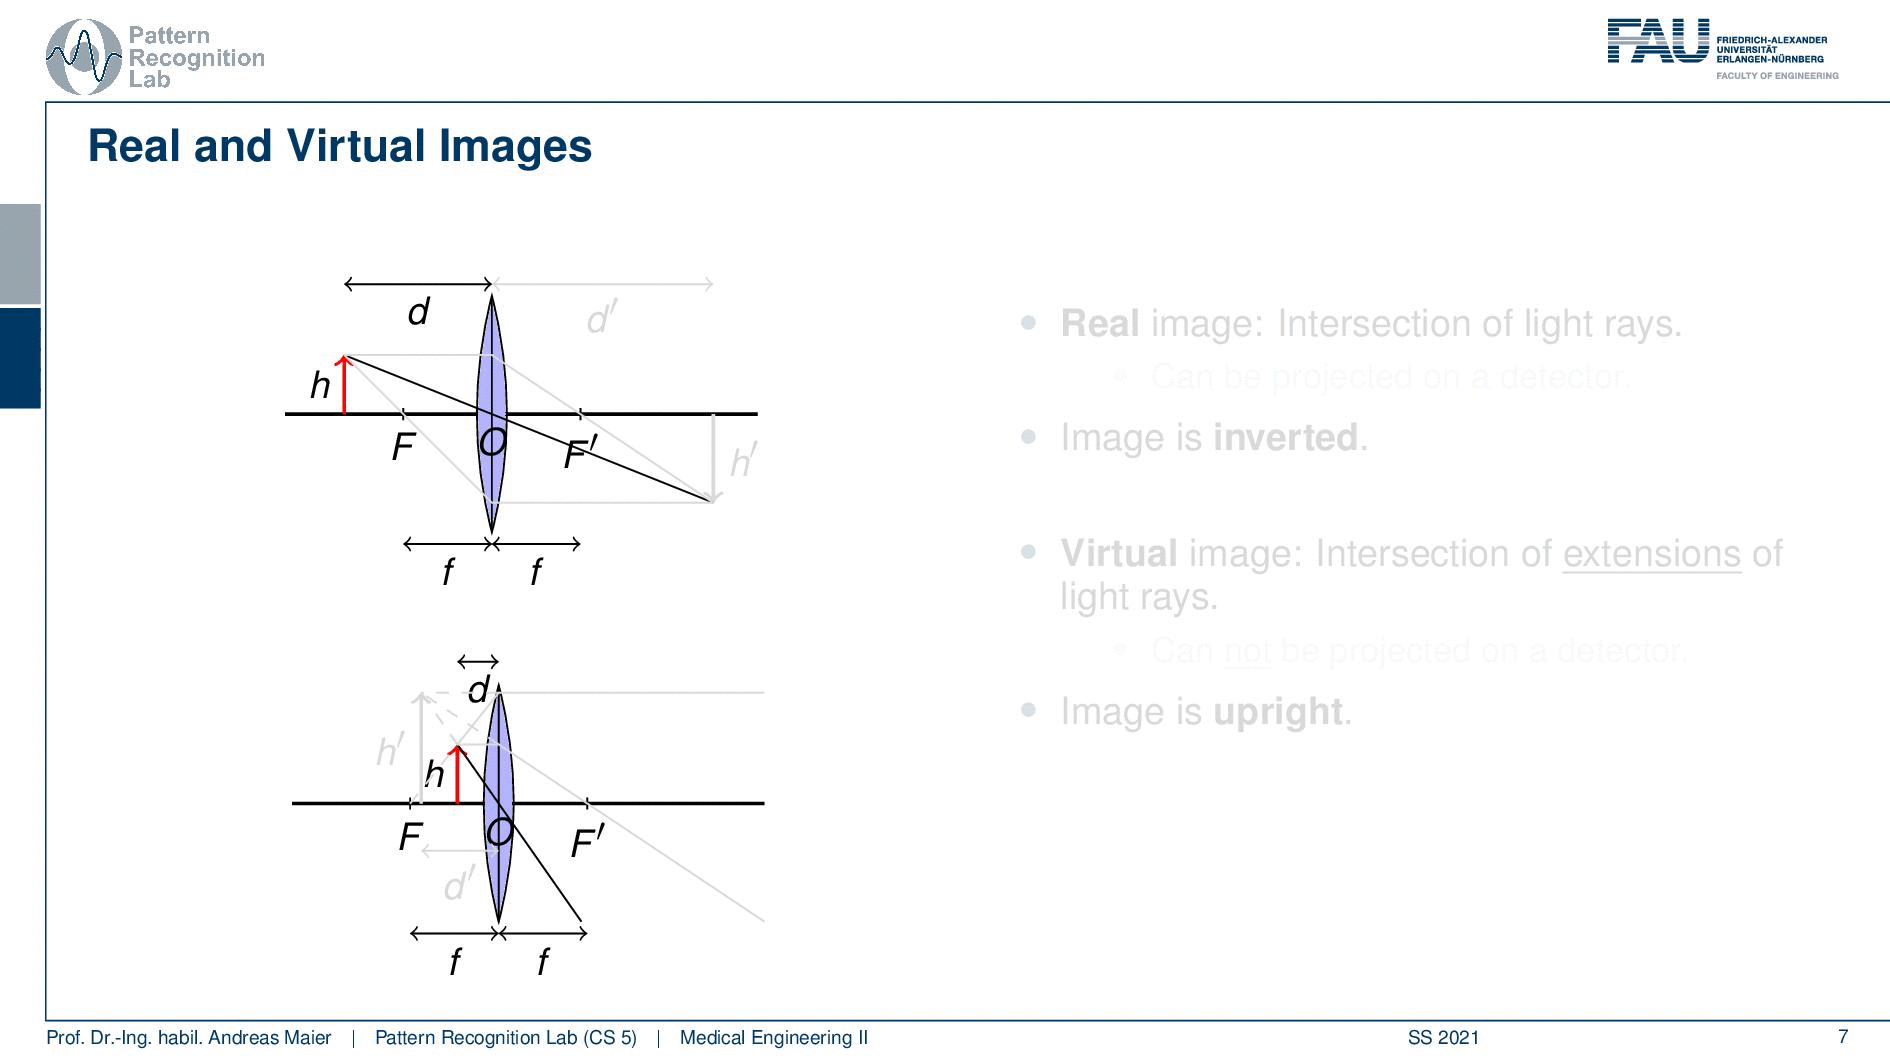
So this is useful so if we have the case where d is greater than F then we have magnification on the other side and if d is smaller than F then we have magnification on the object side. So these two cases are then called the real image because these really the intersection of the light rays. This is on the image side and it can be projected onto a screen or a detector or something that actually is then collecting the light. Then there is the virtual image and the virtual image is the intersection of the extensions of light rays. So the light is actually passing away from there and the problem with that one is it cannot be projected onto a detector. So you need some kind of lens system in order to be able to capture that particular image. On the image side, you see that the image is inverted so h’ on the upper image is on the other side. So it’s upside down and you can see that h’ on the second image is actually oriented in the same way as h and therefore it’s not inverted. So the image is upright so that’s the main difference. So here you have real images and virtual images. The real images can actually be projected onto a screen and the virtual image is scanned and you need additional lens systems in order to make them visible and by the way, this can actually be used for the human eye. So the human eye can be used within such a lens system to be able to see all the virtual images.
Let’s continue and look into the case of the diverging lens and also in the diverging lens we can find specific distances.
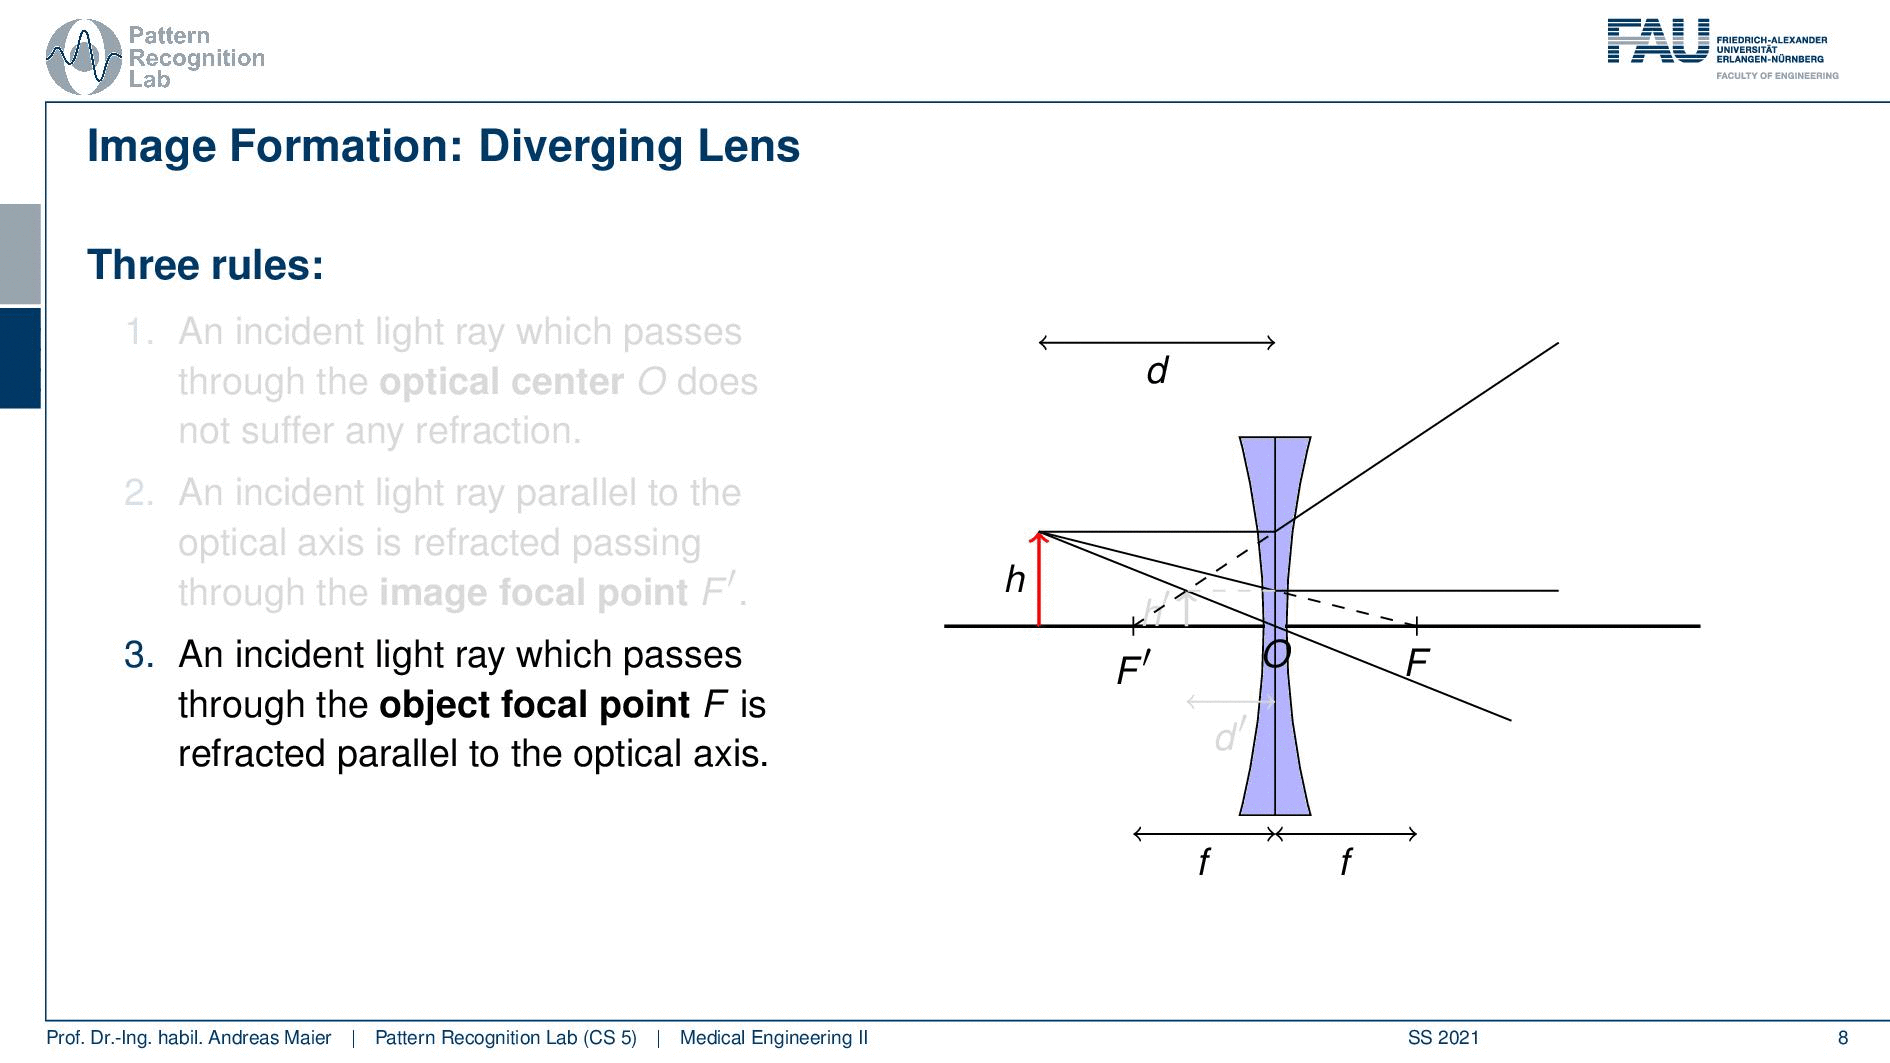
So here we have d and h and then we can think about how these rays are actually passing through our lens system. Again we apply our three rules. An incident light ray passes through the optical center O and does not suffer from memory refraction. A ray that is parallel to the optical axis is refracted passing through the image focal point F’. So here you can see what happens with this ray. Third, an incident ray that passes through the object focal point F is refracted parallel to the optical axis. So if we do so you see that in this case we again get a virtual image. So those three rays intersect but they intersect only in the extensions. So we get a virtual image and this is located at d’ with a height of h’.
Now we can think about the thin lens model. We are interested essentially in the relation between d and d’. So if we know d can we determine d’ if we know the properties of the lens because we want to have sharp images of course. For instance, if we know F and d can we compute now d’ in order to have the entire aperture being drawn geometrically. So can we just use equations to compute d’? This is actually possible and we see that in the following example.
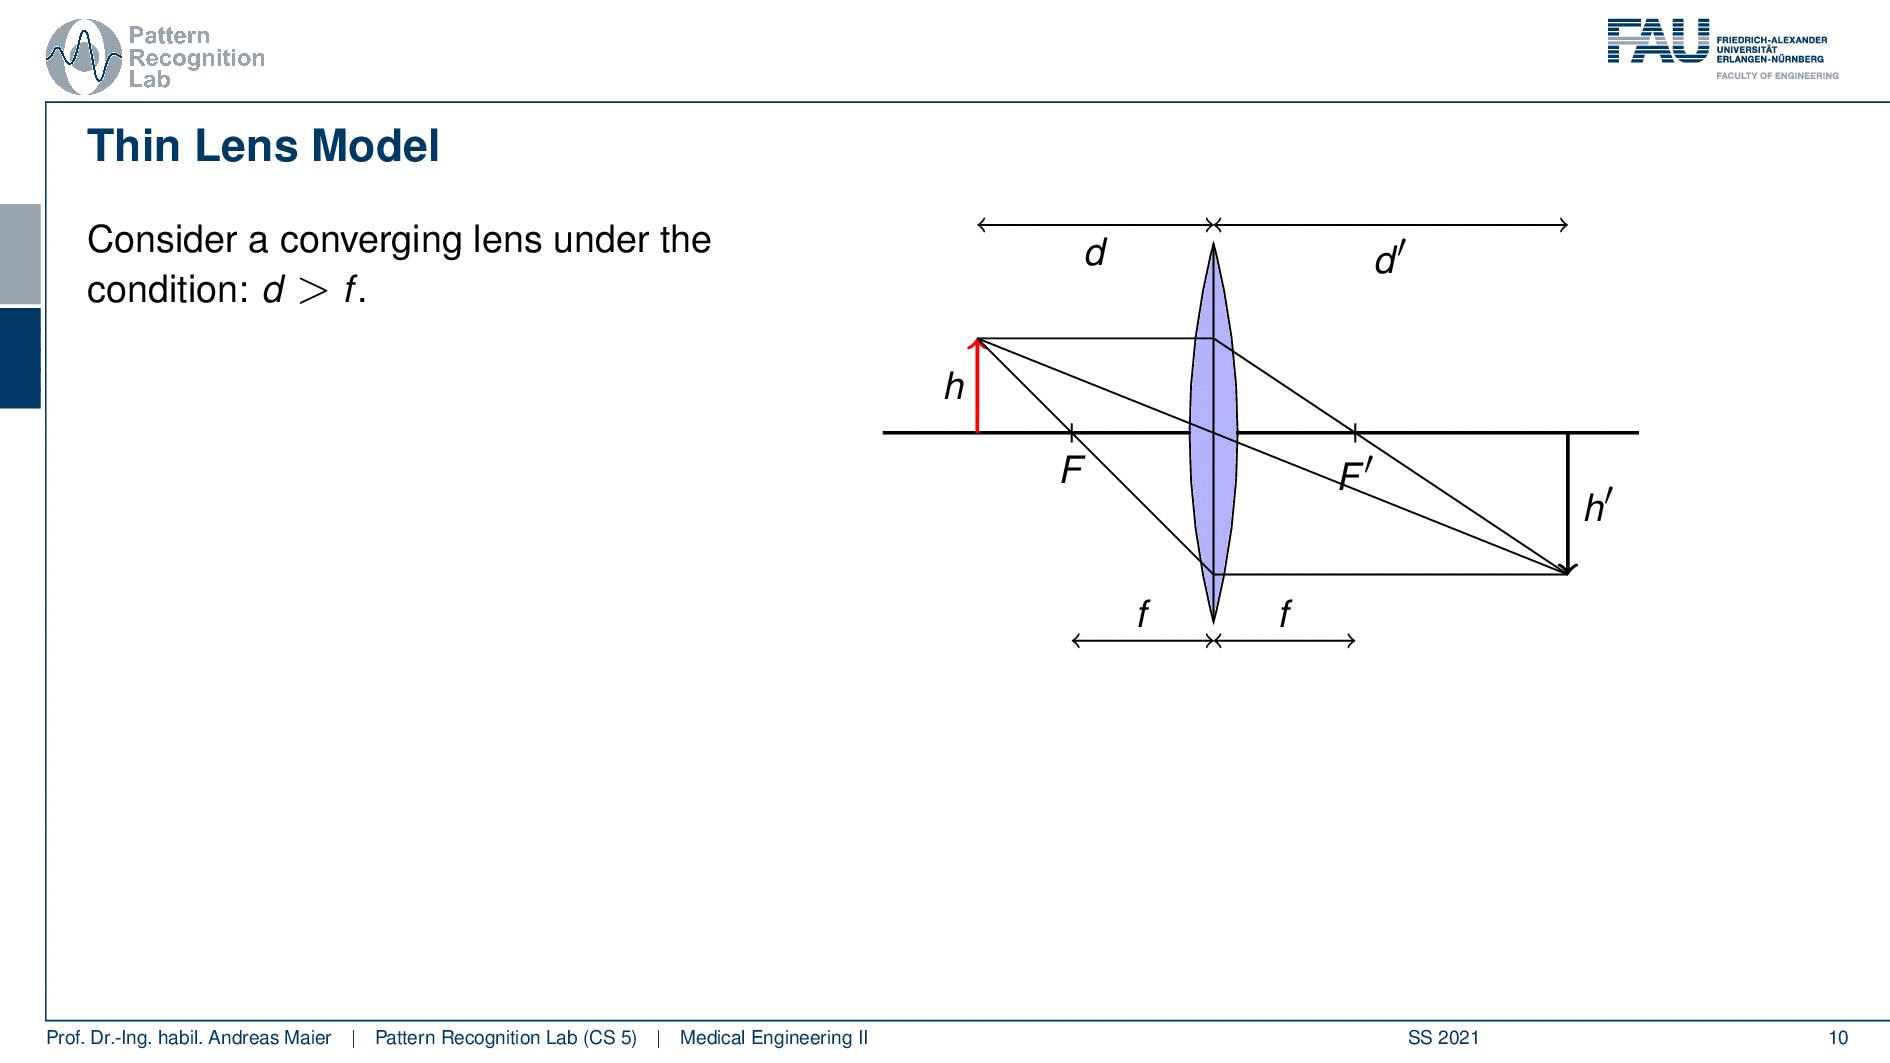
So let’s consider a converging lens again and this is under the condition that d is greater than F. So you see the case here on the right-hand side. Now we can see that we can find actually a couple of triangles and with these triangles, we can set our lengths into relation. In the similar triangles in blue, you can see that h’ over h equals to d’ over d. So very simple geometry here but we can use the fact that those two triangles they’re similar. Therefore we can also see that their sides can be set into relation. So if we do so we can actually also use a second triangle and this is the one here shown in red. They’re similar again and here you can see that h’ over h equals to f over d minus f. So you can see that d minus f is actually the side in the red triangle that contains the h. So this is the remaining length and if you want to see that actually in detail I can show it to you here. So this guy here is this length and this guy here is this length and of course, we also find our h’ here or here. So these are the same because those two here are parallel and then we can also find our f and f is obviously here. So this is essentially this side here and now we can construct the equation down here. So this is actually fairly easy to see. Now if we do that we can set up those two equations and now we can work with them a little bit.
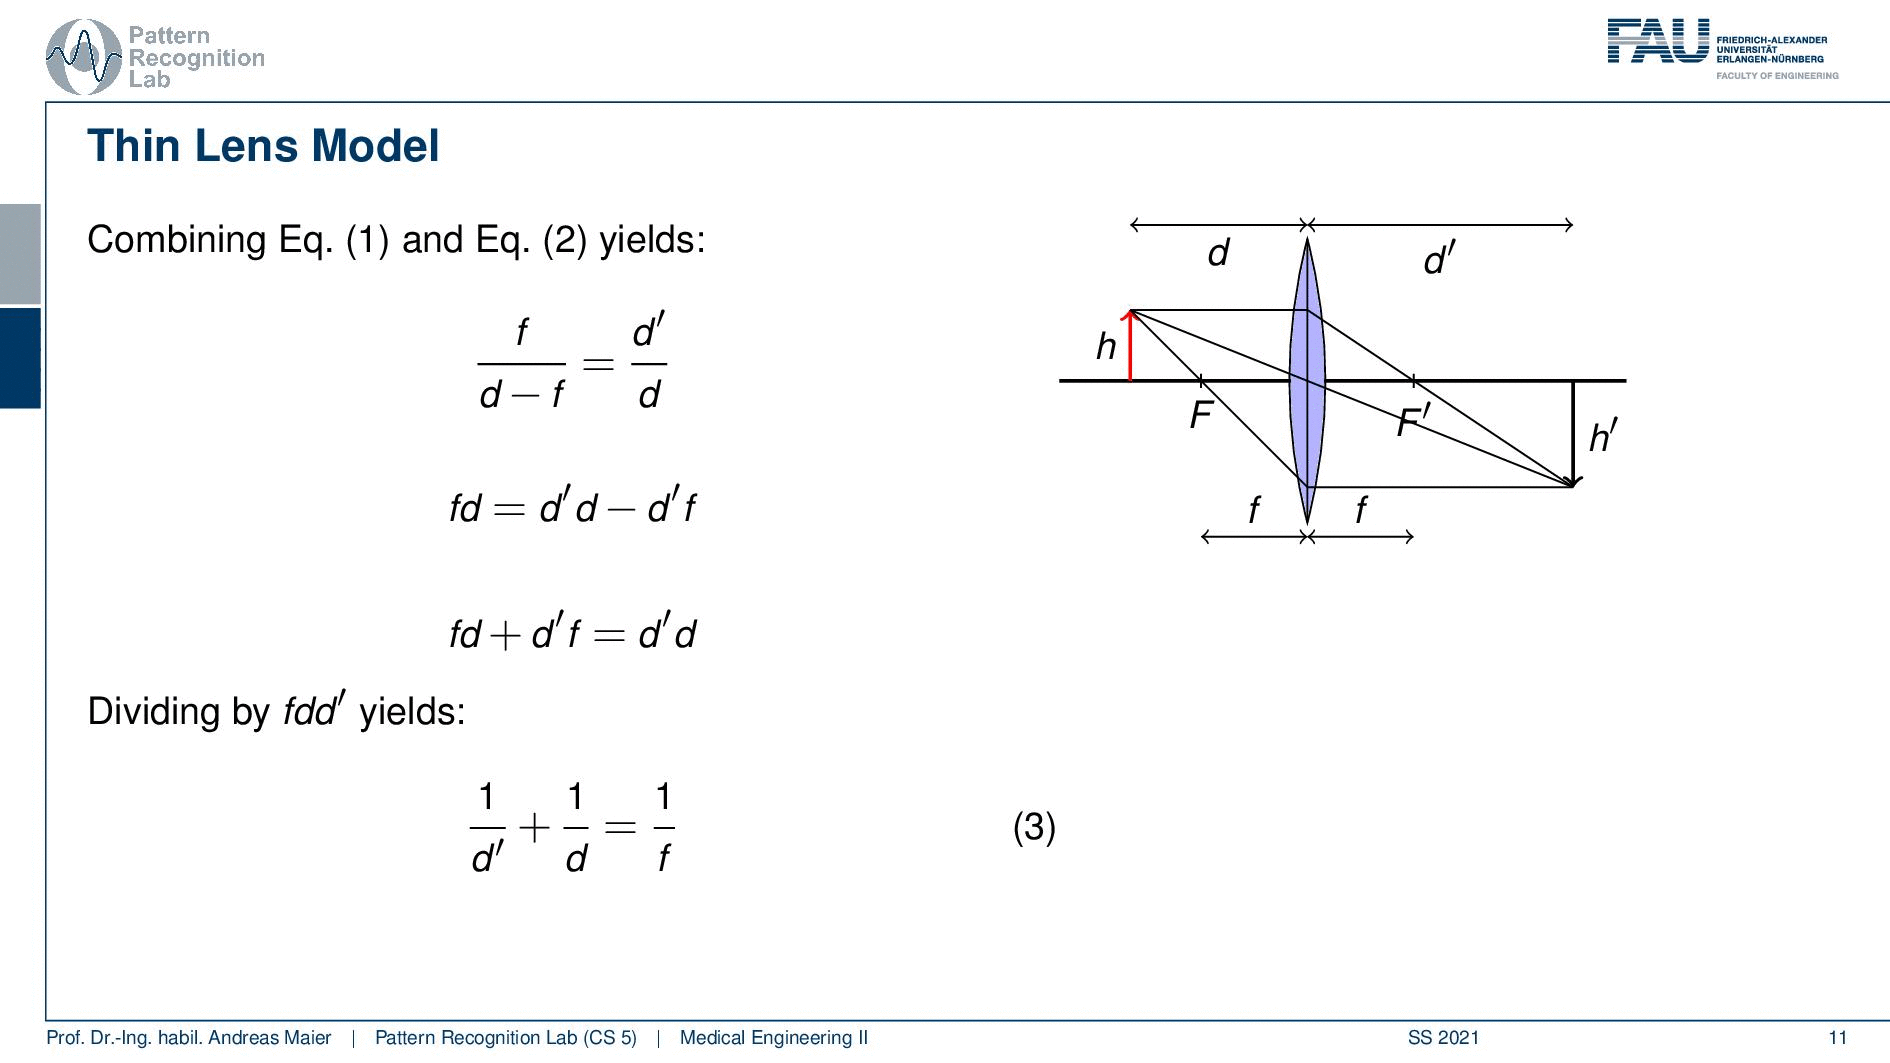
So we actually solve them for h’ over h and then we suddenly get rid of h and h’ and we end up with the equation f over d minus f equals to d’over d. If we rearrange this we can actually multiply with d and d minus f then you see that we get the following relation so we get fd equals to d’d minus d’f. Now we can simply resolve this and move the d’f to the other side. In the next step, we can divide by fdd’ and you see that one over d’ plus one over d equal to 1 over f. This is a fundamental equation that we can use in order to compute our d’ from f and d. So imagine if you’re using a microscope then you can adjust d, d is the distance between the lens and the object. So this can be done mechanically. You know f is a property that is constructed from the lens and this way you can then adjust essentially your d such that it is exactly sharp in your eye. So this is a very important relationship and you will see that this comes in handy when you’re constructing actually microscopes in order to set up a sharp image in your eye.
Now, what else can be done? We can generalize this and this so far has only been derived for real images in a converging lens. Nevertheless, it can also be applied for virtual images and diverging lenses under the following sign conventions. So we have to define that if d’ is lower than zero the image is at the object side of the lens. We have to define that f is lower than zero for diverging lenses. So if we take those two constraints then we can actually generalize over converging and diverging lenses and can compute all of them with the same equation. The third sign convention is that if h’ is lower than zero this is the case for an inverted image then you can use Equation 1 and two and generalize it here to equation four. Then we define a variable m and m is now the magnification and m equals to h’ over h. So this is essentially the ratio and if m is larger than one then it’s essentially a magnification and if m is lower than one then it’s a d magnification that we’d simply get out of this ratio. Then you can write this up also as minus f over d minus f or as minus d’ over d. So all of them can be used as measures for magnification and if you’re designing a microscope then these kinds of relations are very important in order to compute magnifications and to know how the magnification and the microscope will be performed. So we don’t need any geometric considerations in order to compute that. Of course, we can derive all of this from geometry.

Now let’s go ahead and think a bit about this magnification and this is already something that we kind of discussed. So this leads us to the observation that the image of a converging lens is magnified. So the absolute value of m is greater than one, exactly if d is smaller than 2f. So as long as d is smaller than 2f you get magnification in a converging lens. It has the same size as the object if d is exactly 2f and it is d magnified meaning that the absolute value of m is smaller than 1 if our d is greater than 2 times the focal length. The image in a diverging lens is always demagnified as we can also see here in these relations.
Well let’s put that into use and let’s combine several lenses and this is what we’ll do with a compound microscope.
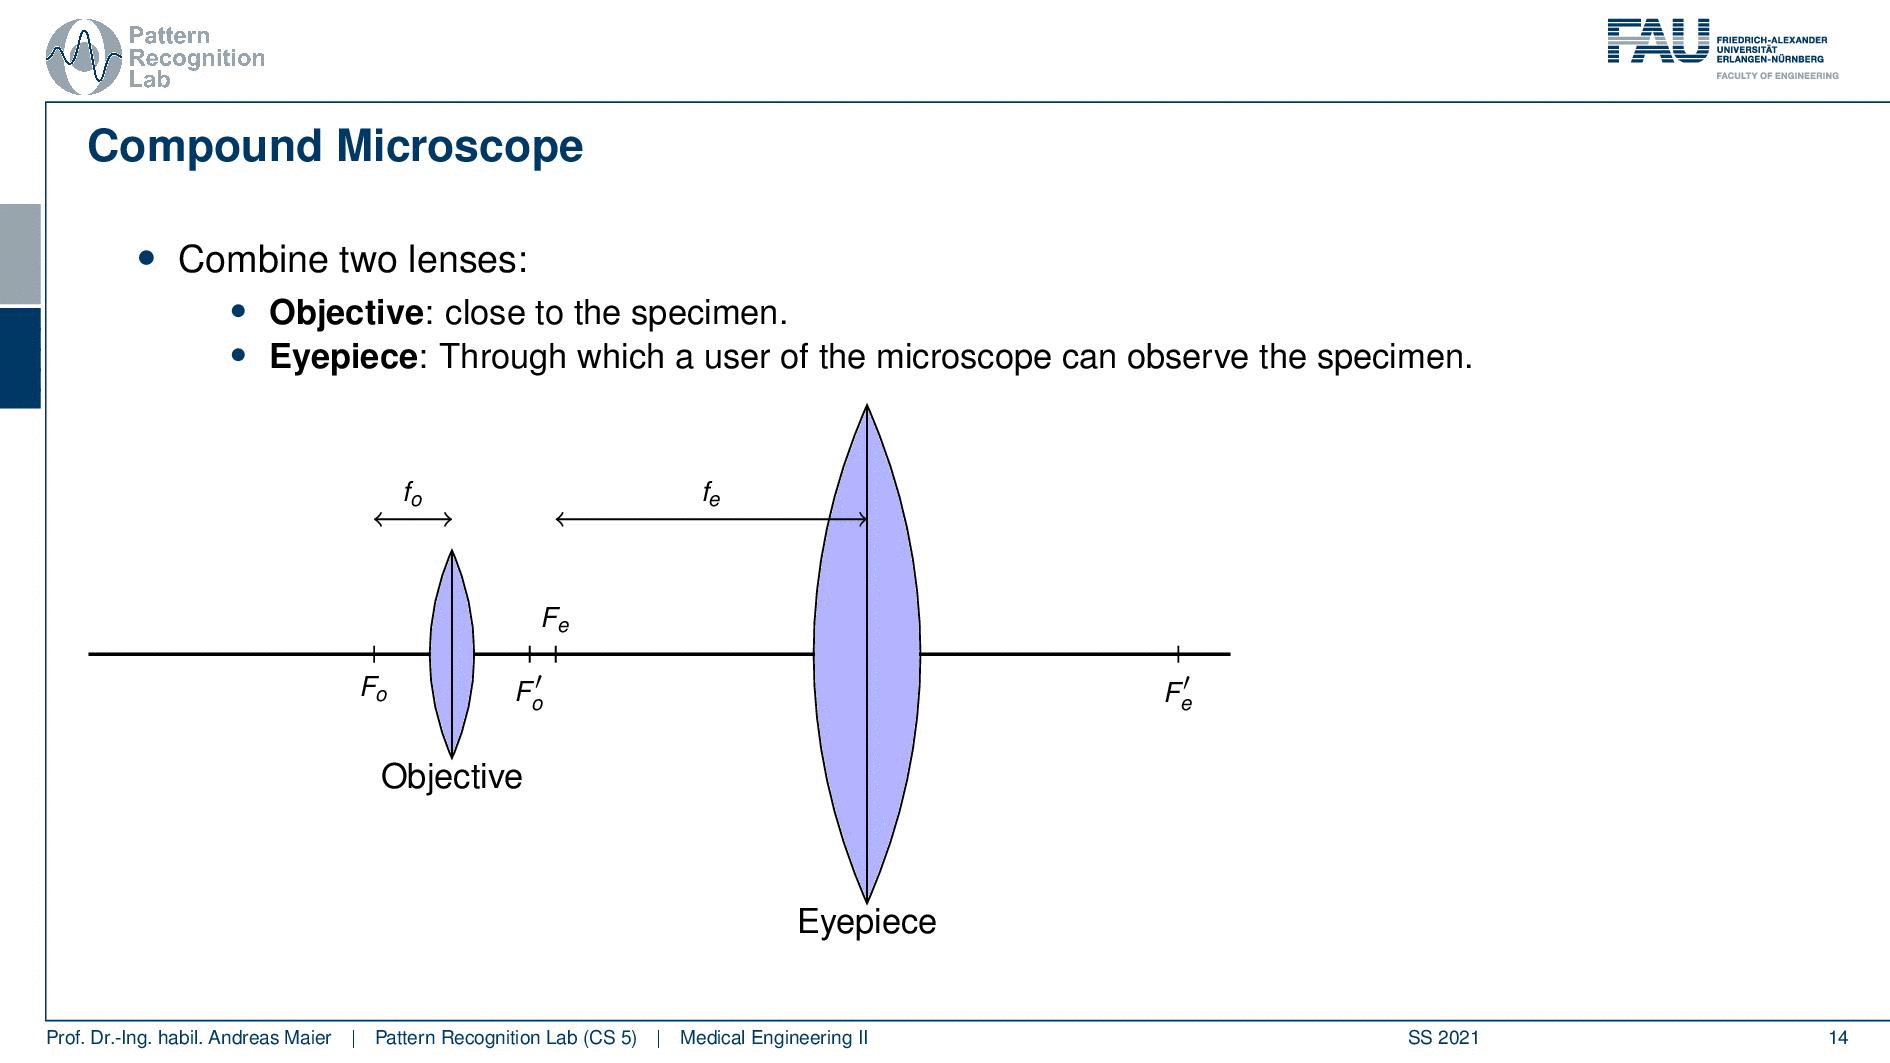
Now the idea in a compound microscope is that we want to combine two lenses. So we have an objective lens that is essentially close to the specimen. Then we have an eyepiece that is essentially a lens that the user looks through in order to observe the specimen. So we have those two lenses and this means that we then also have two focal points. So we have Fo and we have the Fe. So these are the two focal points and we have also two focal lengths that are introduced by the two.
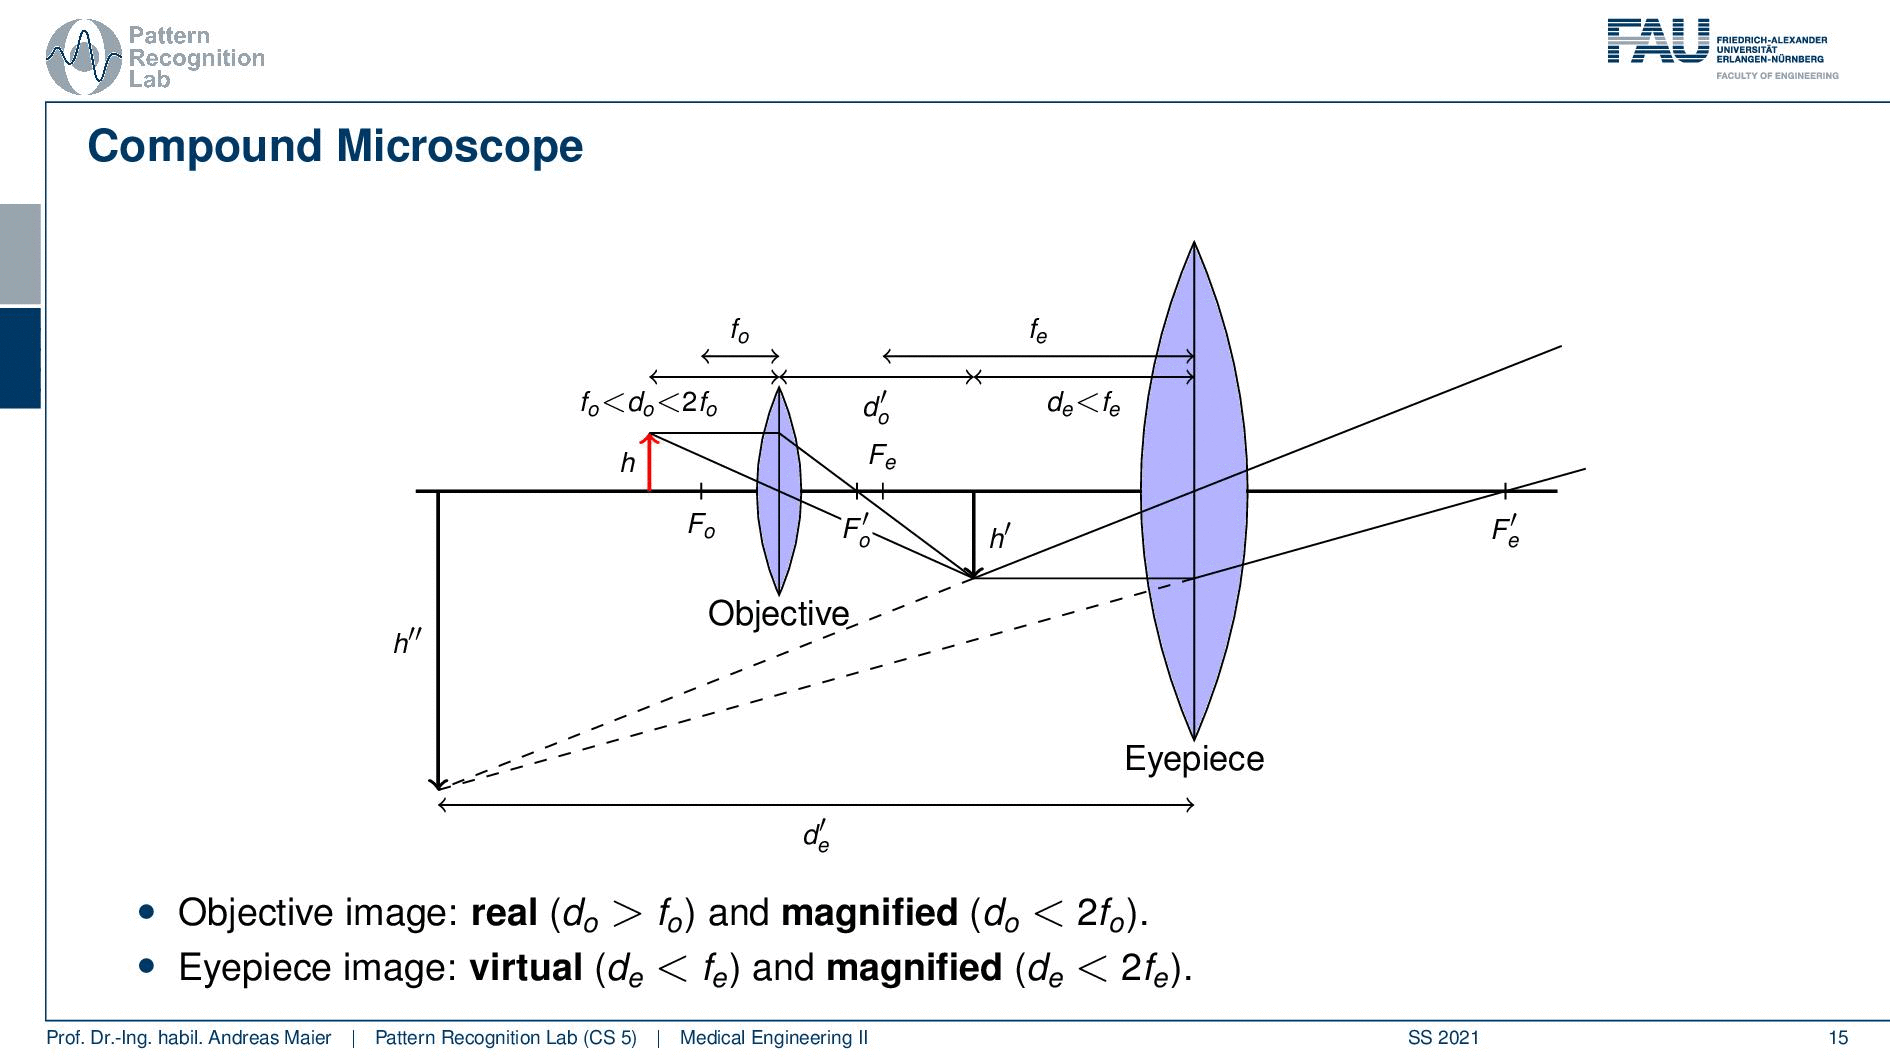
Now let’s place an object here and we can do that and this object is now located between two times the focal length of the objective lens and the focal length of the objective lens. If we do so then you can see that this will give us a real image. This real image is now at the distance d’ which is essentially where we have a sharp image of our object. Now we can pass through the second lens. Now we are at the distance where we are closer than the focal length remember it’s still a magnification. But this will generate us a virtual image that is indicated here. But you see that we can combine the two magnifications and create a virtual image at the height of h’’. So this is how you can combine two lenses in order to generate even more magnification.
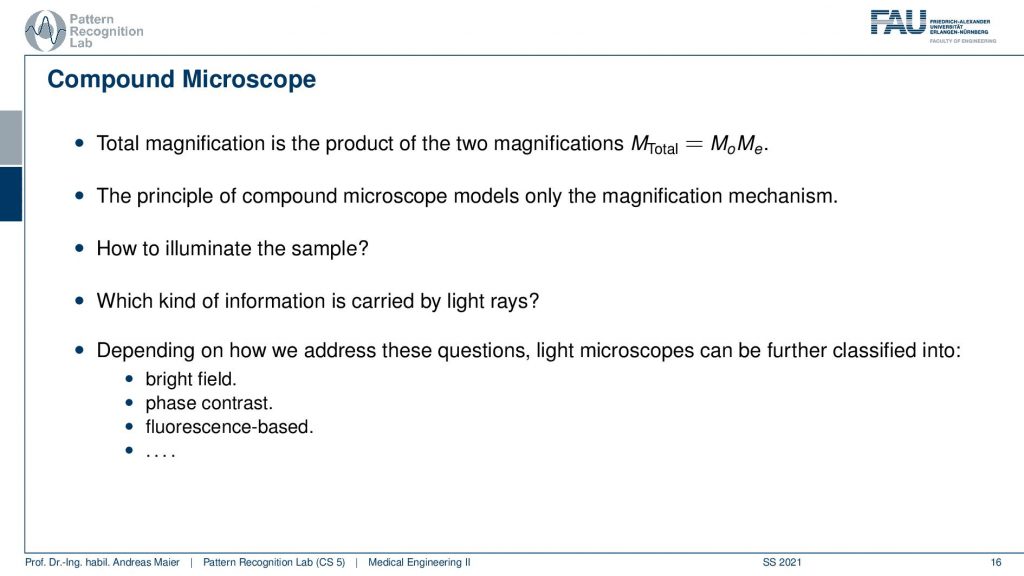
We can also compute them and the trick is now that the total magnification is the product of the two magnifications. So m total is the magnification of the objective lens times the magnification of the eyepiece. Of course, the principle of the compound microscope is able to model this magnification mechanism but what we can’t describe in this model here is what is actually happening with the contrasts. So with the actual light and what is creating the contrast mechanism. We’ve only discussed the geometry so far. So now the question is how do we actually illuminate the sample and what kind of information is actually carried by the light rays? This is something that we want then to discuss in the next video. You’ll see that this will be dependent on how we address this in a light microscope. This can be done in bright field imaging in phase contrast or in fluorescence-based methods and there are also other mechanisms that we will shortly discuss.

We are not finished talking about geometry yet. There’s one thing that we want to discuss and this is called the numerical aperture.
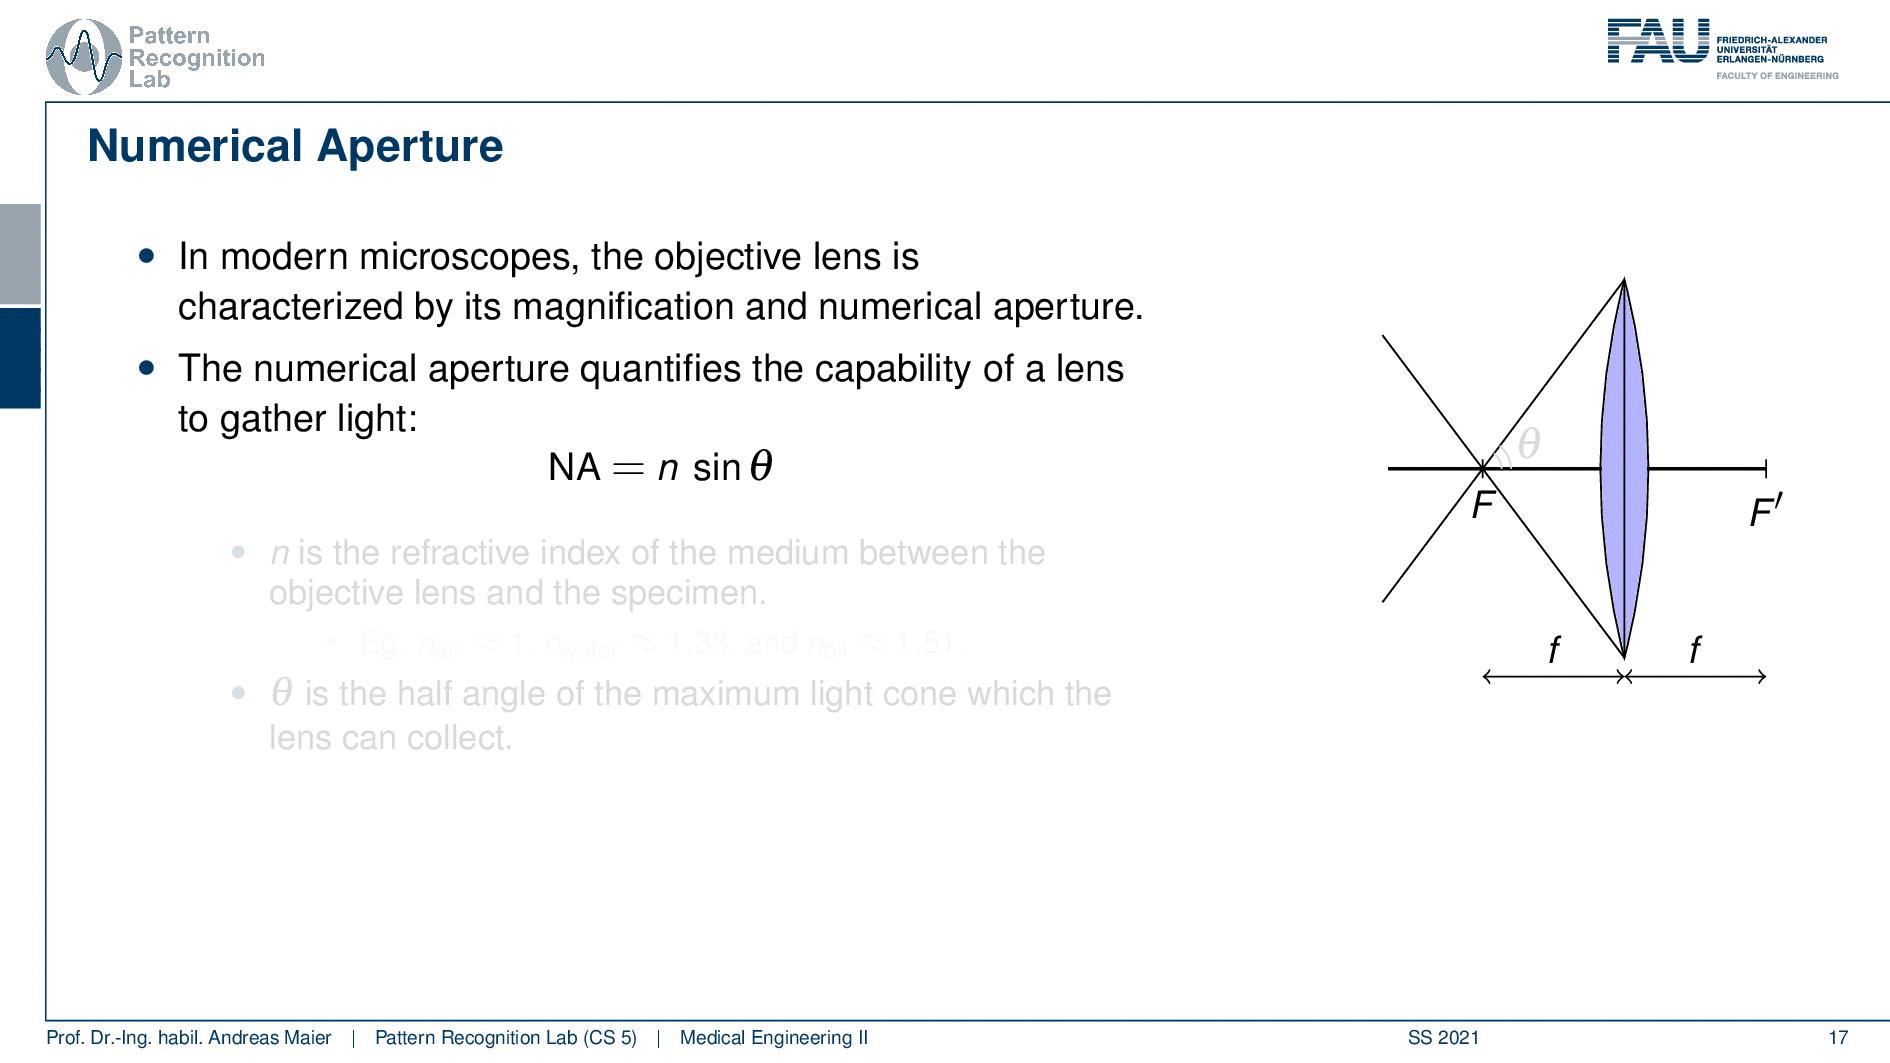
The numerical aperture is the ability to describe how the objective lens is actually dealing with the magnification. This then leads to the concept of the numerical aperture. So the numerical aperture quantifies essentially the capability of a lens to gather light and this is dependent on n and the sinθ. So now what’s n? n is the refractive index of the medium between the objective lens and the specimen. This has actually an impact on the magnification because if you have a different medium than air then you will see that there is additional refraction. Of course, you know when you look from air into the water there’s additional refraction happening. If you choose that wisely, for example, if you embed the sample in the air then it’s approximately one. But if you choose water for example on the objective lens side of course that’s kind of difficult to handle in terms of the mechanism because then the specimen has to be embedded in the water. But this can give you an additional boost to the magnification of your lens. The highest number of n that we know here is the one in oil that we get a factor of 1.51 approximately. So if you embed a specimen in oil then you can get even larger magnifications just by the additional refraction that is happening due to the different physical properties of the materials that have been embedded here. So that’s actually quite useful and we see that oil embeddings can help us to reach even larger magnifications. This is also what we will pick up in the point when we discuss the limits of light microscopy. What else? Well, there is the angle θ and it is the half-angle of the maximum light cone which the lens can actually collect. So you see that here indicated in the figure as θ. So that’s another geometric property and this has to do with the configuration where the focal point actually is and essentially describes the focal length and this with respect to the size of your lens. So this is also an important property and this angle then also describes how far you can actually go with respect to magnification. So we’ll see that the numerical aperture has a maximum that is then driven by the embedding medium. So here we see the oil that is approximately 1.51 and you also see that there is a sign in here. So the largest value that can ever be produced by a sine function would be one so the numerical aperture is bounded approximately at values of 1.15. You can’t get higher with numerical aperture and depending on how you choose the system this is also a constant that allows you to determine the limits of the optical magnification.
Okay, so far we’ve seen the geometry of the system. We’ve seen how the lenses actually work, what divergent lenses are, what converging lenses are and we’ve described how we can actually compute the magnification factors. So we learned about geometry and we’ve seen that if we couple two lenses then we are actually able to multiply the magnifications in order to build even better microscopes. Obviously, with entire lens systems, we could even go further. So one thing that we haven’t discussed at all in this video is how we can actually determine the signal so the light itself. We’ll see that there’s a couple of mechanisms that we’ll talk about in the next video. So I hope you enjoyed watching this video. I’m very much looking forward to seeing you in the next video of Medical Engineering when we talk about the contrast mechanisms in microscopy. Thank you very much for watching and bye.
If you liked this post, you can find more essays here, more educational material on Machine Learning here, or have a look at our Deep Learning Lecture. I would also appreciate a follow on YouTube, Twitter, Facebook, or LinkedIn in case you want to be informed about more essays, videos, and research in the future. This article is released under the Creative Commons 4.0 Attribution License and can be reprinted and modified if referenced. If you are interested in generating transcripts from video lectures try AutoBlog
References
- Maier, A., Steidl, S., Christlein, V., Hornegger, J. Medical Imaging Systems – An Introductory Guide, Springer, Cham, 2018, ISBN 978-3-319-96520-8, Open Access at Springer Link
Video References
- How to Start a Fire with a Magnifying Glass https://youtu.be/D2ym8wt5NWo
- How Lenses Function https://youtu.be/EL9J3Km6wxI
- What is Focal Length https://youtu.be/4CoEsqePADw
- What is Aperture https://youtu.be/YojL7UQTVhc