These are the lecture notes for FAU’s YouTube Lecture “Medical Engineering“. This is a full transcript of the lecture video & matching slides. We hope, you enjoy this as much as the videos. Of course, this transcript was created with deep learning techniques largely automatically and only minor manual modifications were performed. Try it yourself! If you spot mistakes, please let us know!
Welcome back to Medical Engineering. Today we want to continue our exploration of image processing techniques and today’s focus will be non-linear systems and non-linear image processing techniques. Don’t worry we will only look at very simple tricks. But just that you know we are not just bound to linear systems and convolutions there are also very effective image processing techniques that are easy to implement but involve already non-linear systems theory.
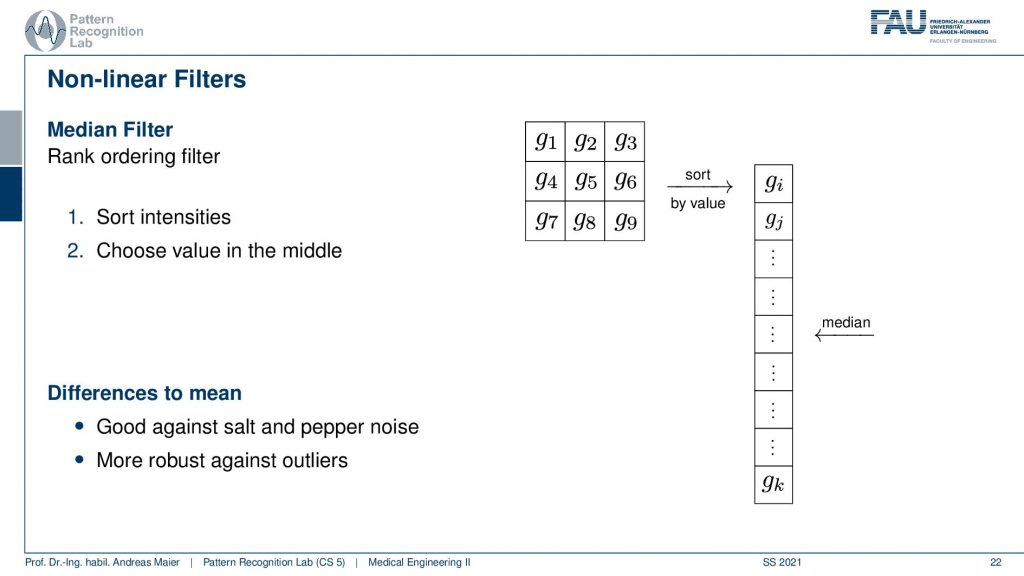
Okay, so here we go non-linear image processing methods. One very popular choice for a non-linear method is the so-called median filter not to confuse with the mean filter. It’s the median and the median is a non-linear filter because we are using again a 3×3 neighborhood but this time we take all of the elements in the 3×3 neighborhood and order them in ascending fashion. So this means that we have to sort for example using quicksort in order to get the sorted array. Then we pick the center value which is the median of the set. Now the median is a very useful statistical tool and in particular, it is very robust against outliers. So if you have a non-gaussian distribution then you will realize that the mean and the median can be very far apart from each other. You can see that if you compute the mean and you have very high or very low values they will be biased towards them. There is a case that is very well known to be very hard for mean filters.
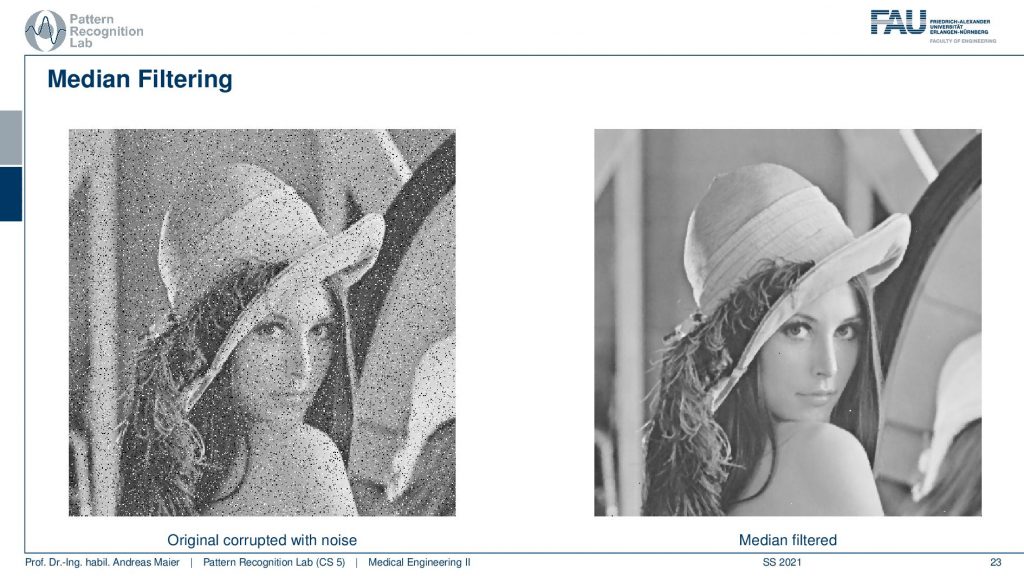
If you have this salt and pepper noise and you process it with the median filter then you can see that those outliers that we have here in black and white are essentially taken from the image. So they have replaced with the median the local median in this 3×3 neighborhood. But we can get also excessive amounts of salt and pepper noise that can be removed with this technique. This is one of the reasons why it’s very popular in image processing and also in pre-processing of medical images.
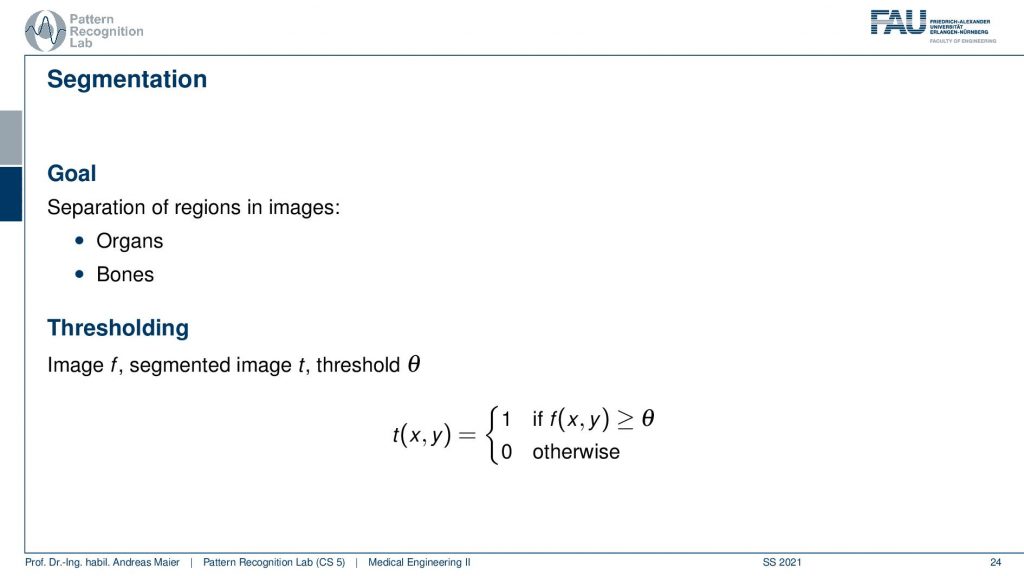
Now another very important technique is image segmentation. For segmentation, we will discuss only very simple approaches. The idea that we want to follow is that we essentially have two objects in the image and one is essentially the object and the other one is the background. Now if we have only two things in the image foreground and background then we can pick a threshold in order to separate the two. So for example we could do that for organs that can be differentiated by contrast or to figure out where the bone in the image is. Now the idea is then that we define a function that takes the image f checks whether the position f(x,y) exceeds the threshold then we assign value 1 and we assign value zero otherwise. So we binarize the image. So there are only two values in the image after we are finished with the processing.
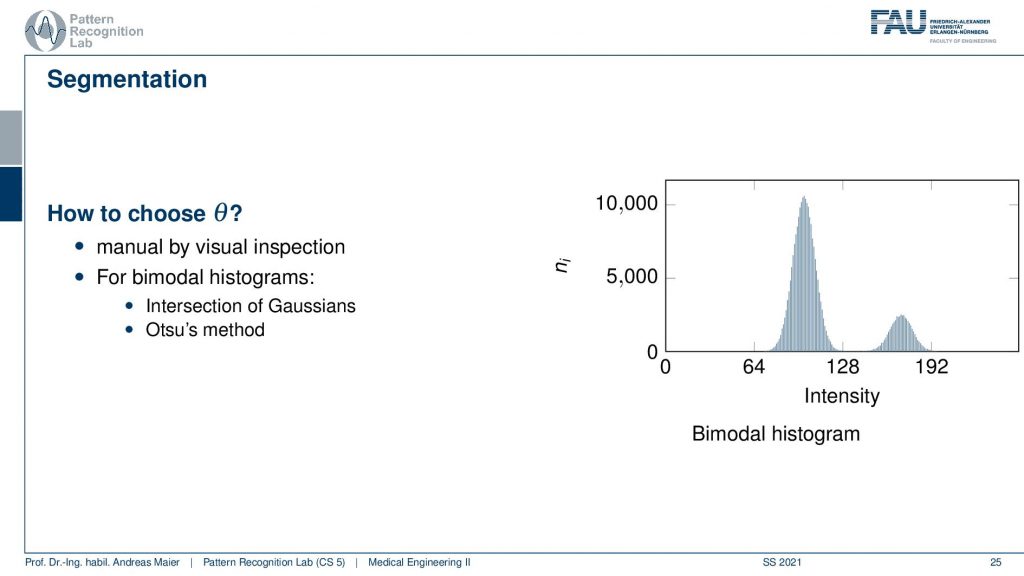
Here we have an example histogram and here we only have two objects. Here we would like to choose our threshold such that the two gaussian bell shapes here are being separated. We can for example check the intersection of Gaussians or the so-called Otsu’s method. If we want to pick this threshold then we essentially end up with different images.
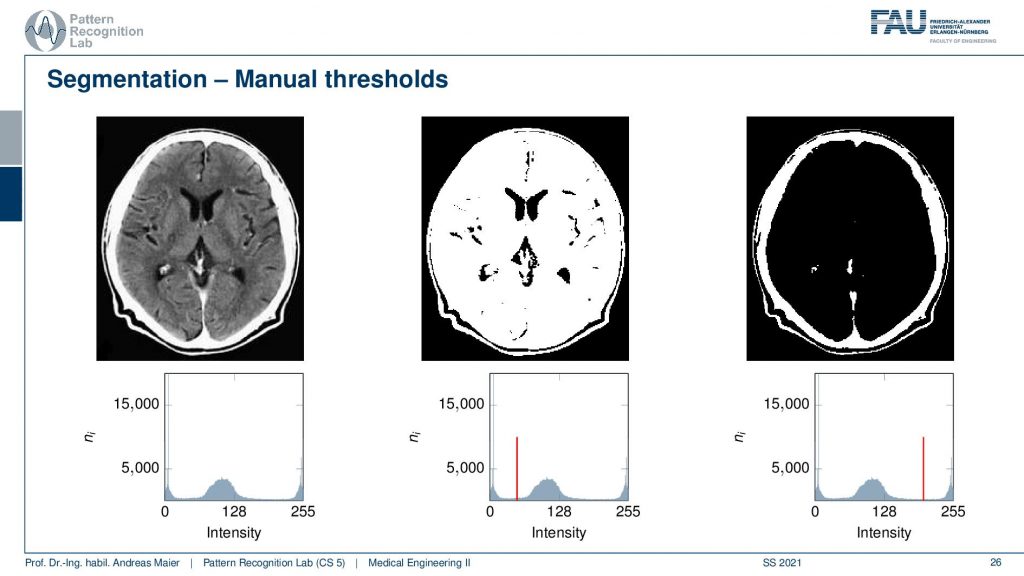
Here you can see examples for the original input image on the left-hand side and then we see the histogram on the bottom. You see here that we essentially have three Gaussians. So we have one for the background that is all close to zero. Then we have one for essentially the brain tissue that is the peak in the center and then we have the skull and bony tissues on the right-hand side. Now if I pick the threshold between the two peaks on the left you can see that we are essentially assigning the brain tissue and the skull tissue to our segmentation mask. If I pick the threshold higher then I’m segmenting essentially only the skull. So this way we can in a very simple approach already start segmenting structures that we want to analyze in the image. Let’s go to a simpler example and this is where you can see the power of Otsu’s method.
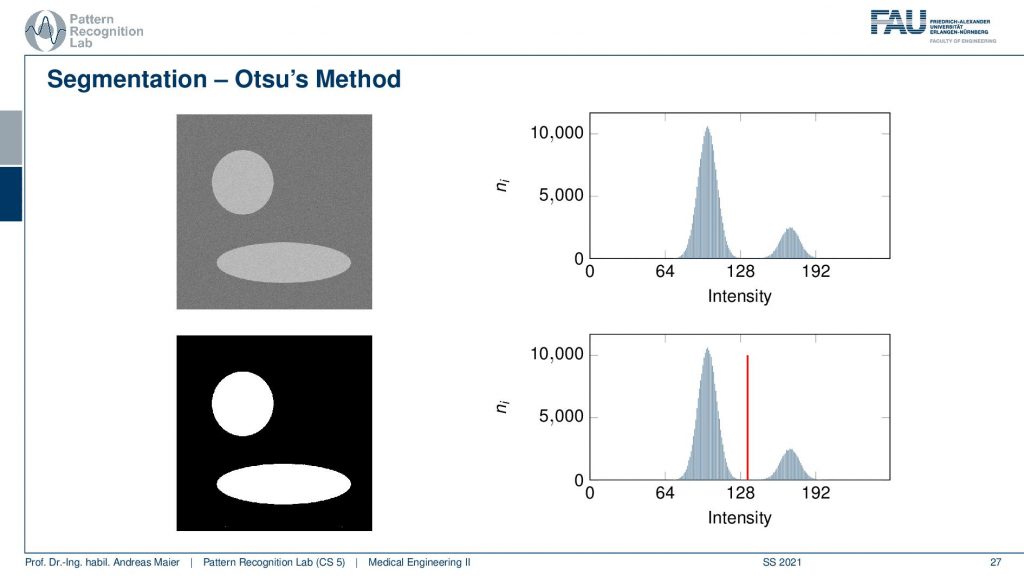
So in Otsu’s method, you essentially compute a test statistic at every histogram bin and then you decide to set the threshold at the beta pin where this test statistic is minimal. So you would iterate over all the bins compute the statistic and then assign at the position where you got the lowest statistic. Here is this very simple example. Now, we had some background that is in a dark gray and some objects that are in a light gray. If we now compute the binarization of this you see that we can very nicely differentiate the circle and the ellipse from the background using the segmentation approach.

Now once you have masks that are images that only consist of zeros and ones then we can start talking about morphological operations.
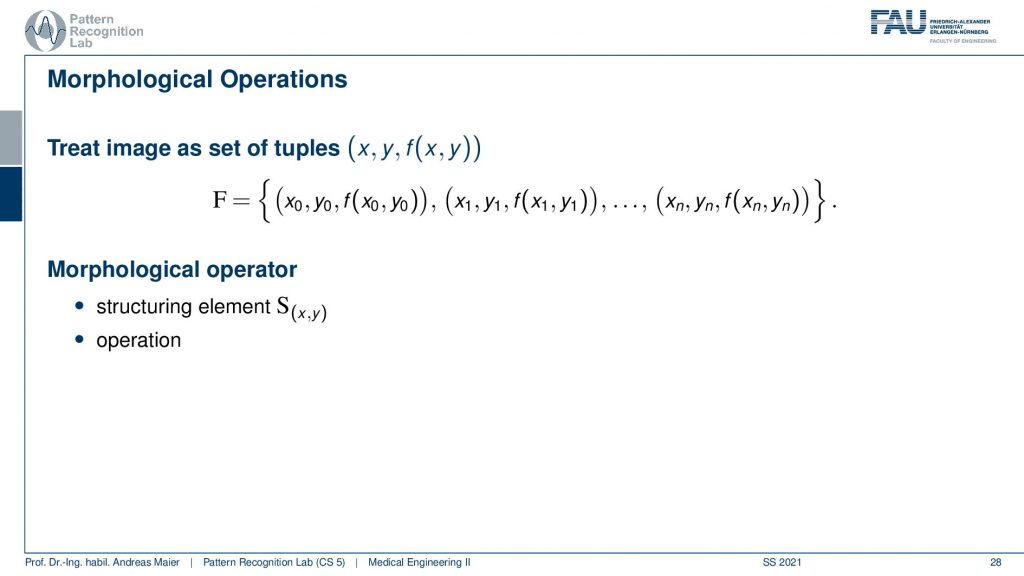
Now, morphological operations interpret the image as a set. You can say now that ones and zeros essentially mean that you’re part of the set or not. So your entire image becomes a set of tuples. So you have the pixel (x,y) and the value of f(x,y). So this is a set of all the points and then you introduce a so-called morphological operator that consists of a so-called structuring element and the operation.
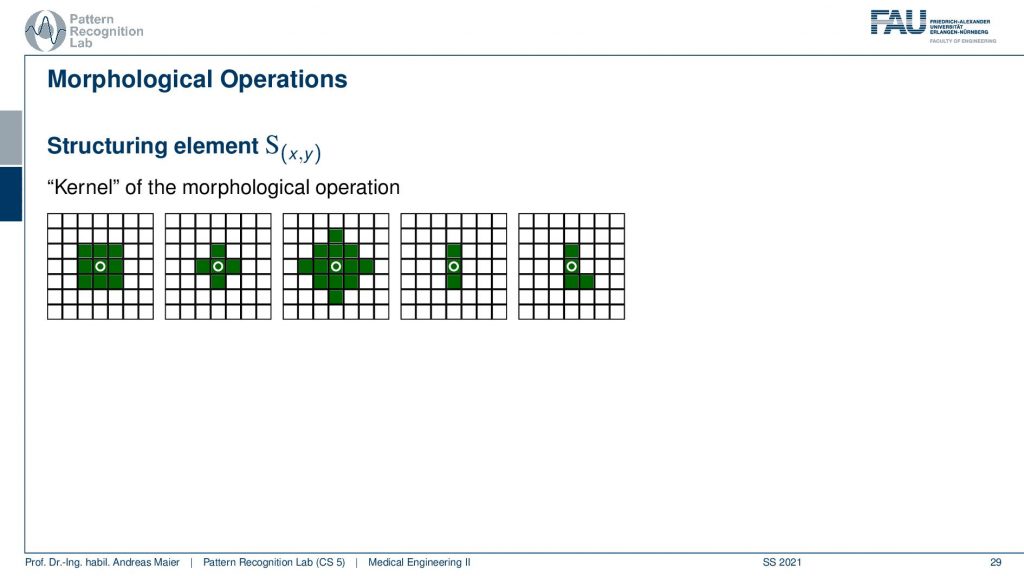
Now the idea of the structuring element is to define a neighborhood in which you apply the operation. So here we have a couple of kernels you could say these structuring elements and on the left-hand side, you see a 3X3 neighborhood. But you could also pick a neighborhood like this plus shape or the diamond shape or you could even take structuring elements that are only in one direction or even in very strange elements like the one here on the right-hand side which has this L kind of shape. They are determined by the purpose where you want to use them for. If you use them then you can go ahead and apply a specific operation to your image.
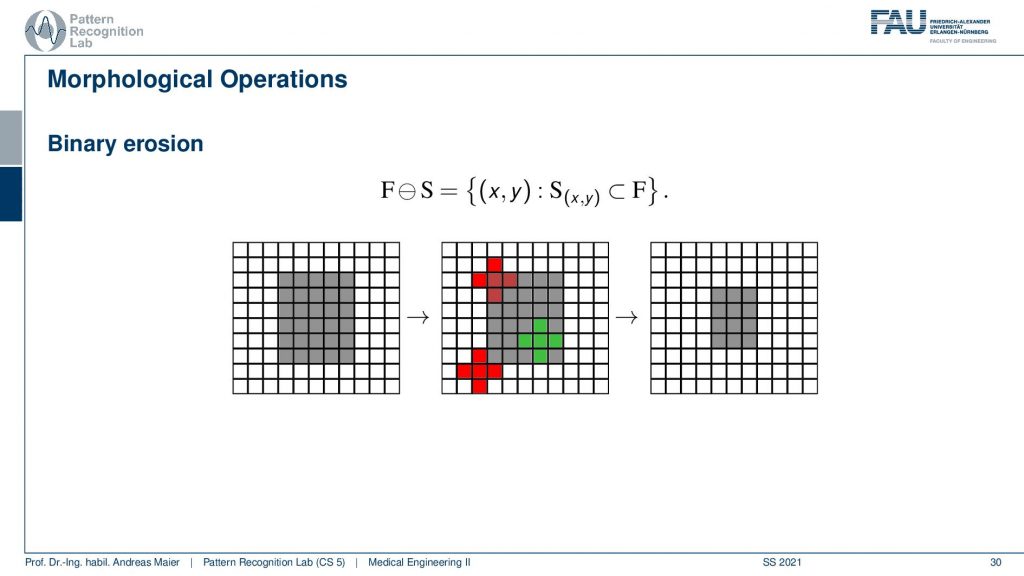
So here you can see an example where we apply the so-called binary erosion. The binary erosion will return true if and only if all elements in the structuring element are part of the mask. So what happens here is you have the input on the left-hand side, then we have three different positions of the structuring element. You see the outcome in red and green. So the red structuring elements will not be fulfilled because there is at least one element that is not part of the mask. So the output will be zero towards the output of the morphological operation. Only the green element is completely within the mask and will therefore be preserved. This is also why it’s called erosion because we essentially can shrink masks. So by repeated application of erosion, you shrink masks and can reduce the size. So if you have a problem with over-segmentation and you want to make your masks just a little bit smaller then you pick erosion. On the contrary, you can apply an operation that is called dilation.

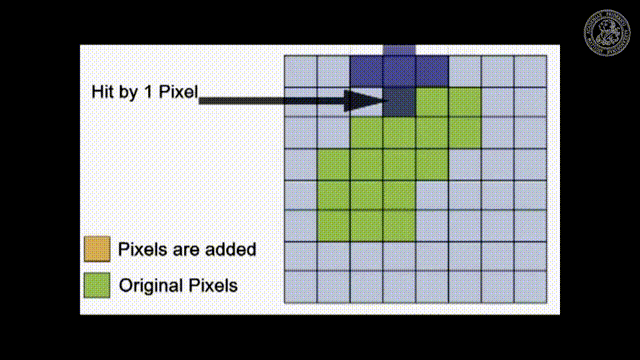
Dilation essentially returns true as soon as one element of the structuring element is touching the mask. So here you see the input on the left-hand side and now again three different positions for the structuring element. Only the red one is returning false because it never touches the mask. The two green ones will both return true and this then results in the output on the right-hand side where you see that we are kind of expanding the mask. So this is why it’s called dilation because we are dilating we’re increasing the size of the mask.
These effects can also be applied to grayscale operations.
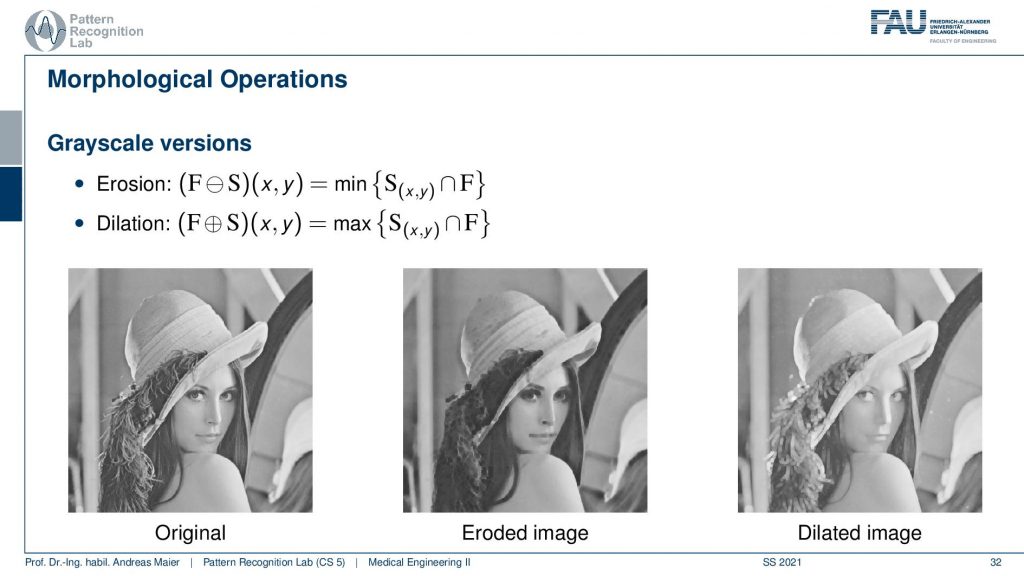
In grayscale operations, you would then replace the logical operations that we had earlier with minimum and maximum within the structuring element. Then you assign essentially at the center element the respective result of the maximum over the structuring element or the minimum of the structuring element. We can also combine morphological operations and one combination is Opening.
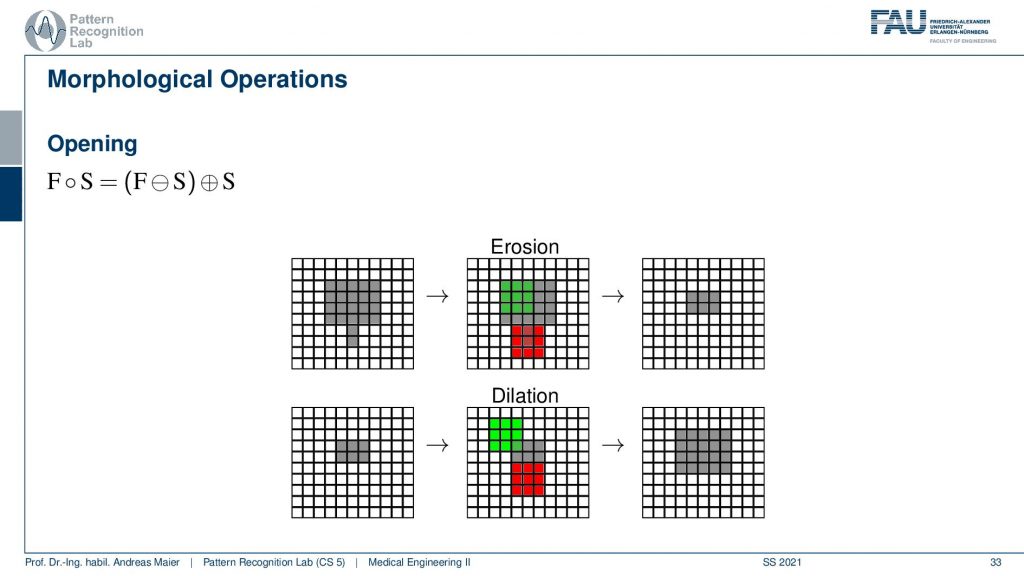
The opening is applying first erosion then dilation. So first we shrink and then we expand. The opening is very useful if you want to preserve the size of the mask but you want to get rid of small outliers. If you have small antennas like the one in the example here you can get rid of them with erosion.
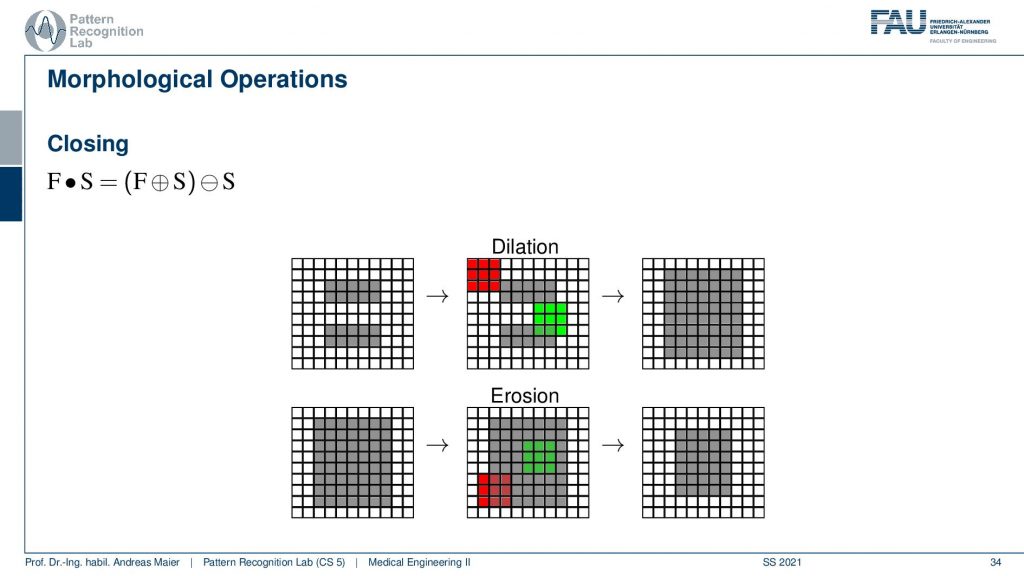
There is also the opposite you dilate first and then erode and this is called Closing. Because if you have small gaps in the mask they will be filled because you dilate first so the gaps are closed then you erode and shrink the mask again to the original size. So you see that these concepts can also be applied to our idea using grayscale values using maximum-minimum operations. You can also use quantiles. So there are many different ways how you can expand on those morphological operations. We won’t be able to cover all these in this class. But I can give you a hint on further reading.
If you want to know more about these techniques then you can go to our textbook there we have a little more details on all of the different operations. We also have these examples in there and I very much recommend having a look at the respective chapter in the book.
So thank you very much for listening. I hope you now got the first impression of all the different things that can be done with image processing. We are only touching this here there are many many more things in image analysis and organ segmentation, multi-organ segmentation. But these are all parts of image processing that you can learn about in your later studies. So if you like this and you want to figure out what is happening in the image, how large is the liver? where are the bones? where are anatomic landmarks? This is all image processing. We actually have two more lectures on medical image processing. There is diagnostic medical image processing and interventional medical image processing which are available for you towards the end of your bachelor’s studies beginning of your masters. So we recommend taking the class in the fifth or sixth semester because then you have all the mathematical foundations to dive deep into the domain of medical image processing. So this ends our excursion into systems theory and image processing and in the next videos, we will look into different modalities. The first one that we’ll start with is gonna be the endoscopy. So thank you very much for watching and looking forward to seeing you in the next video, bye-bye.
If you liked this post, you can find more essays here, more educational material on Machine Learning here, or have a look at our Deep Learning Lecture. I would also appreciate a follow on YouTube, Twitter, Facebook, or LinkedIn in case you want to be informed about more essays, videos, and research in the future. This article is released under the Creative Commons 4.0 Attribution License and can be reprinted and modified if referenced. If you are interested in generating transcripts from video lectures try AutoBlog
References
- Maier, A., Steidl, S., Christlein, V., Hornegger, J. Medical Imaging Systems – An Introductory Guide, Springer, Cham, 2018, ISBN 978-3-319-96520-8, Open Access at Springer Link
Video References
- Xia Zhong – Action Learning for 3D Point Cloud Based Organ Segmentation https://arxiv.org/abs/1806.05724
- SmarT E-Learning Erosion https://youtu.be/fmyE7DiaIYQ
SmarT E-Learning Dilation https://youtu.be/xO3ED27rMHs