These are the lecture notes for FAU’s YouTube Lecture “Medical Engineering“. This is a full transcript of the lecture video & matching slides. We hope, you enjoy this as much as the videos. Of course, this transcript was created with deep learning techniques largely automatically and only minor manual modifications were performed. Try it yourself! If you spot mistakes, please let us know!
Welcome to our new lecture Medical Engineering and you see that this semester I’m recording in English. So I hope that you can still follow the lecture in the English language. If you have trouble with the English language there’s also a previous recording available of this entire class that is completely in German. So I will link that in the description of this video. If you want to encounter the English language and if you want to get into the field using the language of the field that I would recommend continuing with the English version of the video and you see that essentially the language of the engineer it’s not german it’s not English it’s not Chinese but it’s broken English. So if you listen to this class you can hear that I speak with a kind of a german accent but you will probably get used to that because if you go to international conferences if you work with people in the field internationally at big tech companies you will realize that many of them are non-natives in English. So they speak to a very good degree, of course, English but sometimes this is of course broken English and this is the reason I’m also recording this class in English such that you can get acquainted with the language already. You will see that you will get to know many different new words and new concepts and you can already learn them in English we also provide translation help for this class. So we have a vocabulary list where you can then look up different terms in English and see the German translation. But you will realize that many of the concepts are actually new you might not have heard about them in german either way. So you can just go ahead and learn everything in the English language. So I think this is good preparation to get started in your studies and to see that what we are doing is not just related to things that are happening in Germany but we are actually interested in going into an international context. The class will be more or less about different imaging technologies. The physics behind it, the math behind it, the signal processing, and in the next two videos I want to introduce several of the modalities show what they’re good for, and demonstrate a couple of images and we’ll discuss also a bit of the different use cases where you use those modalities. So I hope you will find this lecture quite interesting. This will be accompanied by exercises at our university so there will also be programming tasks and I’ll also give a short introduction on how to actually register for the programming exercises here in this video. So looking forward to an exciting semester with you guys.
So medical engineering imaging systems and today we have the motivation. You will see that we will are offering this class here at the pattern recognition lab. This is our website has just been refurbished we would be actually located on the ninth floor of the computer science tower. But actually, we have another online semester so you will barely ever see anybody there. So I can recommend that you interact with us of course with email and our online learning platforms and of course we also publish our videos and our teaching materials open source. So you can see that you can also see those videos on YouTube and other platforms. My name is Andreas Maier and I will be lecturing the entire class.
So what are the topics and the aims of the lecture? We want of course to show interesting applications and present the important fundamentals and relate them to practical implementation. So in the exercises, there will be exercises in the project work. So you will implement methods from the lecture. They should deepen the understanding and you learn the foundations of medical image processing. So you will also need to actually be able to implement stuff and this will be done in java and we have exercises where you essentially developing ImageJ plugins. So ImageJ is an open-source software package that essentially can read most medical images and with that, you will learn how to do the image processing on the respective images.
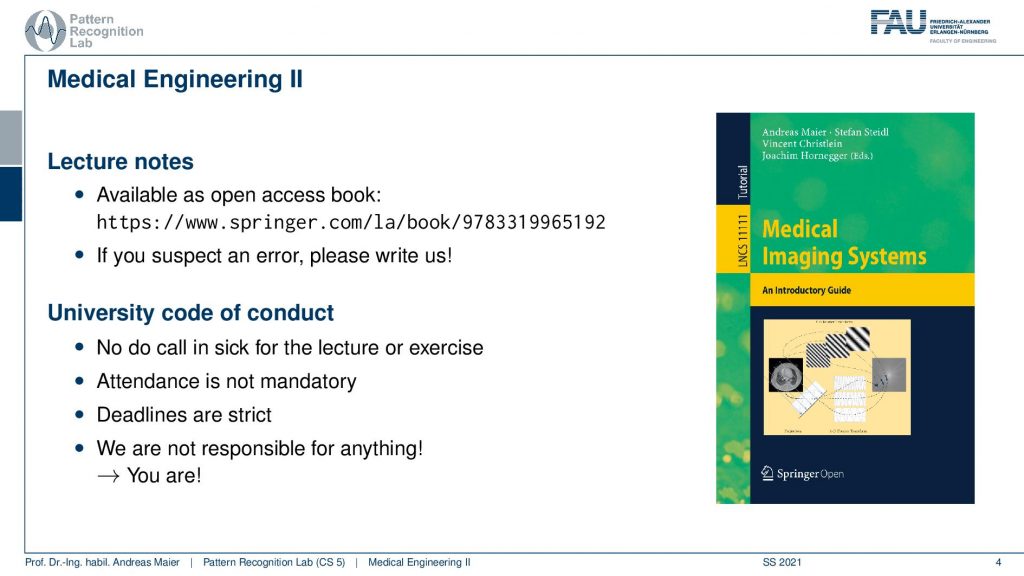
This course is also available as a coursebook. So this has been published with open access by springer. So you can download the entire book if you click on this link or if you type in the URL we’ll also provide it in the description of the video and of course as in any textbook if you suspect an error in the book please write us. We paid quite a bit of attention to do as little error as possible but of course, there is sometimes errors in the textbook. If you think there’s something wrong just let us know and we will also hint at problems in the book if you suspect any of them. Yeah please follow the University code of conduct. So this is a second-semester class so you may not be acquainted with all the different procedures in the university for example you don’t have to call in sick for lectures or exercises. Now we’re recording anyway. So there is absolutely no point in that you just look at the lectures in the sequence as you like. We try to keep the lecture videos rather short such that it’s not 90-minute lectures as you would have in in-person lectures in the lecture hall. Of course, attendance is not mandatory. It doesn’t mean that you don’t have to learn what is happening in the lectures. It is of course an aim of this class that you understand the different techniques. But you don’t have to attend the lecture. So we are offering this coursebook and we are offering videos. You don’t have to use all of them but it’s sufficient if you learn with one of the different approaches to get into the subject. Of course, you have to attend the exercises and the deadlines are strict. So it’s not like that you can just let them pass or something like that. If you don’t submit in time yeah you will not pass the module. So this is really strict and please be on time with the submission of the exercises. Then you are responsible essentially for all of the things that could possibly go wrong. So it’s also your obligation to be informed about things. We will of course hint about them so you can see them in the online platforms you can see them of course here in the lecture. But it’s not like if you miss the deadline of the exercise we announced them several times and it’s your responsibility to obey the deadline. So don’t come blaming us oh I didn’t know and I’m my dog ate the exercise and I couldn’t submit it or something like this. If you don’t submit in time it’s your responsibility.
Generally, there is no exam. No written or oral exam in this class. But it will be a graded project work and the condition to the admission to the project work is that you fulfill 50 of all the exercise points. So this means that you have to pass some of the exercises to get at least 50 percent of the points.

Note that this doesn’t mean that you just have to submit 50 of the exercises. Because you might have small mistakes and then you’re not going to get 100% of the points. So probably you will actually have to do quite a few of the exercises of course if they go really well then you can essentially stop after reaching the number of points. Yet we don’t recommend doing that because the exercises are actually related to the project work. They can also help you with completing the project work. So please follow up on the exercise and please implement the things that we have prepared for you. Also do not copy. We have automatic checks for plagiarism and we have software in place and if you have plagiarism in your project work or in exercises this immediately leads to zero points in the exercise and a grade of 5.0 which is essentially not passed in the project work. So please don’t do copying pasting. And please keep that in the back of your mind for the entire study program if you do that you will go to hell. So don’t do it. So this is severe misconduct and we will get really upset if you try to do that and believe me the software that we’re using is really good and we have solutions of the previous exercises and so on. We will find you. So don’t copy-paste from other groups, don’t steal from them. We will find you and you will have a very hard time explaining why you submitted exactly the same code as a different group. So just don’t do it. Please work independently.

Well, there is also an evaluation for this class and the evaluation means that there is a central system set up and you get to assign points and there are three text fields. Please follow the evaluation process. Towards the end of the semester, you will get a link and in this link, you can then submit the feedback that you want to give us. Please note that the feedback is meant to improve the class. So it won’t help a lot if it’s full of insults and you know you’re anonymous and you can behave like on Facebook and Twitter and so on. It’s actually not that anonymous because the number of students in this class is rather small and still it may be like a hundred students in the class. But you know you’re part of this class. So it’s not like on an anonymous account because you will be one person within this group. Of course, if you send insults and stuff like that we won’t get upset. We will deal with the issues in a very professional way and still, this is not a great way of communicating with each other. Of course, there is the critique and of course, we do things wrong. So please don’t hold back with critique. But if you offer a critique then it might also be worth thinking about it and what things can actually be improved. Because if you just complain then that’s really hard to improve on the lecture. But if you go ahead and actually tell us look I didn’t like this and this and this and this is how I would improve it then this is much easier to follow and this is something that we can much easily implement and you will see that throughout this class we have numerous iterations. So we’ve been teaching this class for a very long time now and we improve it every semester. So you see also this semester although we are online and we all recorded it a year ago. We do new recordings because we want to have better recordings and we want to have a better class. So this is why we re-record. Of course, this evaluation is of course anonymous and it has really a high impact on the teaching and of course, there is some impact on the lecture if you have a really bad evaluation then you have to explain it to you know the other professors at the university. But actually, the evaluation aims to improve the lecture and make a better class for future students and if you have an issue with the class please contact us. Please let us know we try to improve as soon as we learn that there is a problem with the class we try to improve on that. So in the ideal case if you give us the feedback early it’s also you who can really improve on structured feedback and the different means of feedback. By the way, we are also hosting an anonymous forum in our learning platform such that you can also give anonymous feedback there in case that you know you are afraid that we might get really angry if we hear critique and stuff like that. That’s why we also offer an anonymous way of communicating with us such that you don’t have to disclose your name.

So what are also important things well there is a password that you need to register for the class and this is done in EST and StudOn and therefore you need the password that I’m showing here on the slides. Remember if you have any trouble with that there is help if you send an email to mt-hilfe@i5.cs.fau.de and of course, you can send requests in German and that’s no issue everybody in amongst the students and so on everybody speaks german. So that’s not a big deal.
Let’s look a bit into the structure of the class and we will walk you through different medical imaging modalities. We will talk about many modalities and I have a short summary of the modalities that you will learn about in this class and you see that I have them listed here.
We will introduce the topic of general image and signal processing. So this is something that you need to know what an image is so what are things that are shown on the image? How do I process these images? How can I detect you know fractures? What are perfusion images? what are lesions? Can I image actually metabolism and many many many other things that are visible on medical images?
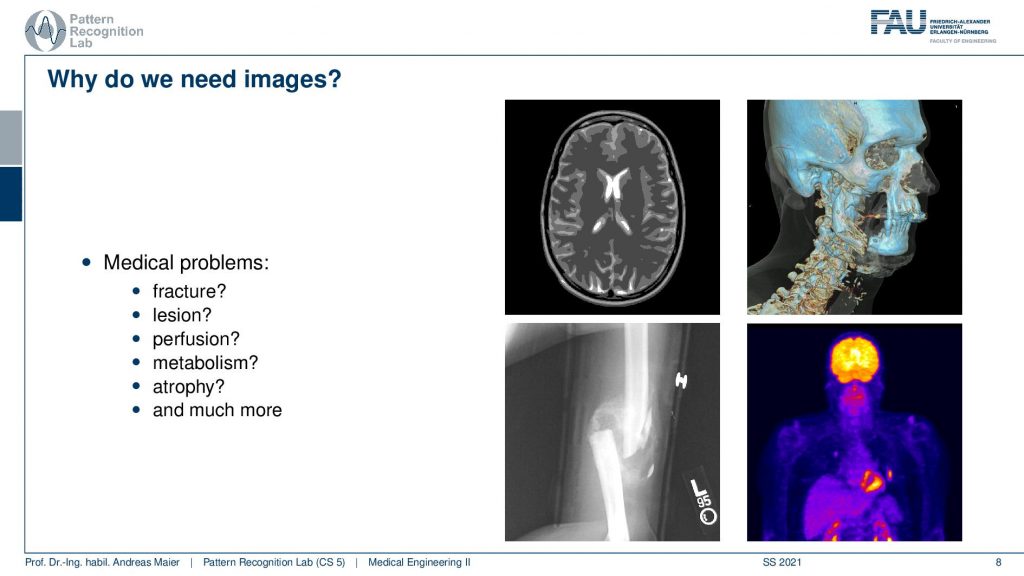
You can see already here that we have a couple of images here on the right-hand side and you see that there are 3d modalities, there are 2d modalities, and all kinds of images that are being used in medicine in order to perform diagnosis. You probably have seen the CT images on the top right where you can see the bones really well. But there’s also x-ray projection imaging like on the bottom left and there are even techniques that allow you to show metabolism like shown on the bottom right. So this is a lot of different techniques and you see that all of these techniques have been developed in order to improve medical diagnosis. You see that this is still a topic of today’s research because in every step in every new modality we want to have better means of diagnosis. If you find something out about a certain disease then you want to have the ideal optimal means to diagnose that specific disease. Quite often these are actually medical images. The medical images are pretty cool because you can look into the body often even without opening them. So you see here slice images and 3d images of the body without ever having to harm the body.
So you see that these are the main imaging modalities that we’ll talk about. This will range from X-ray, CT, Endoscopy, Ultrasound then PET, SPECT which are functional modalities MRI(magnetic resonance imaging), Optical Coherence tomography all these kinds of modalities are also covered in the book.
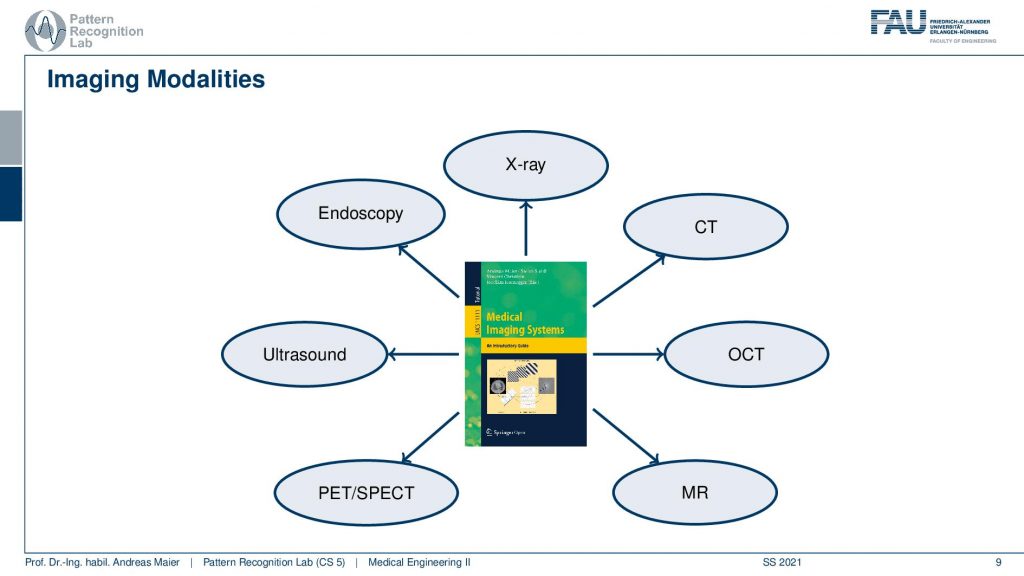
So there’s actually more than what we are showing here. But we will stick only to the most important ones in this introductory presentation. So let’s start with the first modality and the first modality is endoscopy.
So in endoscopy, you actually have an endoscope and an endoscope is essentially a camera and this camera is mounted here on a very long stick.
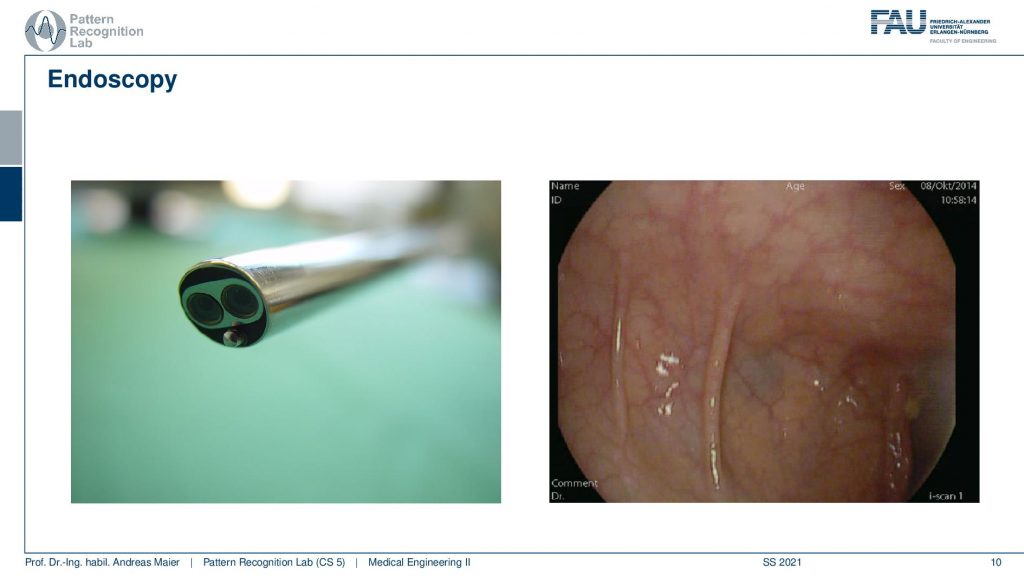
So you have even a stereo system here which has two lenses that are shown here on the left-hand side and with that, you can go inside of the body and look at different things. You see here on the right-hand side this is a part of the stomach. So we here we are actually looking at the mucosa and you see that there is also a bit of slime on the skin. We see that we are inside the body here. So this is a pretty popular technique in terms of imaging. It’s very similar to a regular camera but it is mounted with special optics such that you can look inside the body. There are things like colonoscopy where you go inside the body with the camera and of course there are also many other endoscopic procedures that are minimally invasive where you have a small cut and then you enter the endoscope into the body.
Well, what else? A very very popular technique is X-rays and in X-rays, you can image through the body.
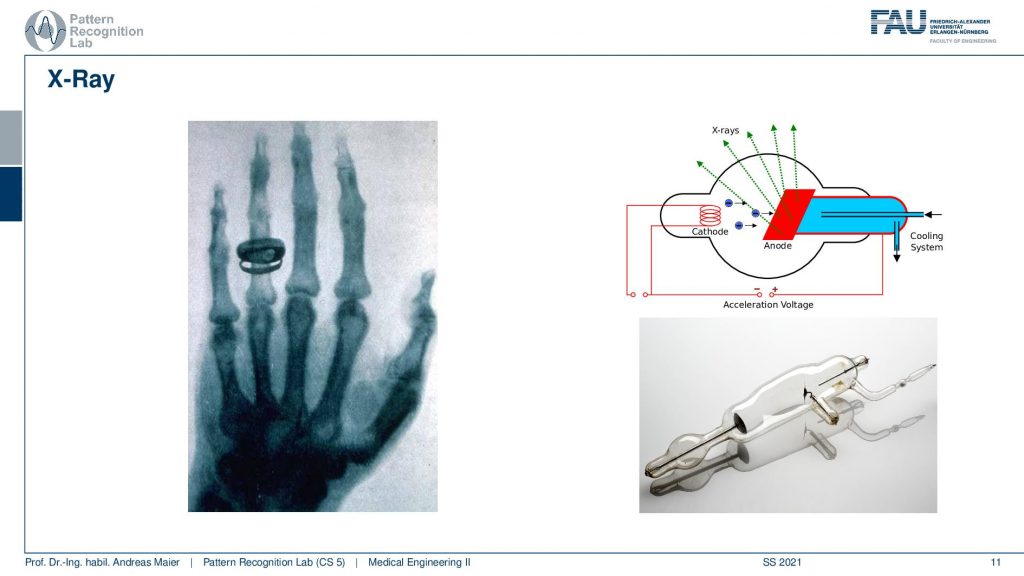
So you can take images that show the inside of the body here on the left-hand side you see one of the oldest images. So this is actually Kulik’s hand so one of the first x-rays that were ever taken by Redken himself by the way and here you see the hand you see the bones you see dense material. this dense material is absorbing high-energy photons. So this is a very high-energy light and with that, you can look through the body and image the bones. This is then generated by so-called X-ray tubes and here on the right-hand side, you see a schematic of an x-ray tube and how the x-rays are actually generated. So you need some high voltage power source with that you can then accelerate electrons and the electrons hit into the anode disc and generate x-rays on the way. These x-rays are so strong that you can penetrate the body. So we will look in the lectures on X-rays how to actually generate the X-rays? What is the physics behind it and how we get these very interesting images here on the left-hand side? By the way, there is also a very interesting story about the left-hand side image. We actually have that in the textbook. So if you want to figure out what the discussions about the image on the left-hand side are please have a look at the textbook. You will find that this is actually quite surprising and there are actually two images that are around and they get confused quite often. We have the actual story in the book.

Well, what else? There are also techniques that are X-ray-based and one thing that I want to show here is Angiography.
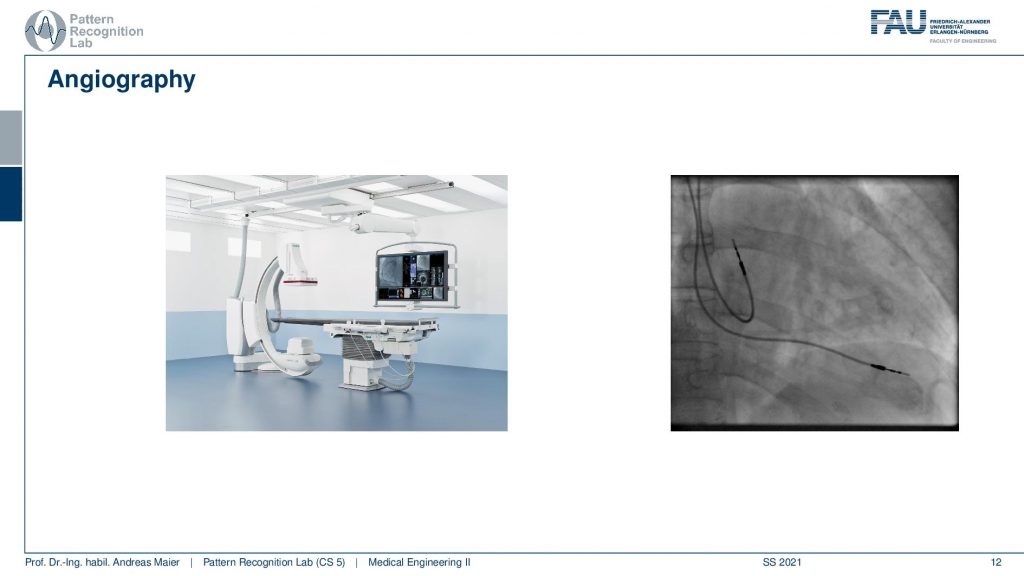
So in Angiography, you have specialized systems that are mounted in an operation theatre. So in an OR and there you use x-rays on the table where the patient is lying during the intervention. This is used to guide minimally invasive interventions. So here only a very small cut is made maybe in the groin or at actually quite far distant locations of the location where we actually want to operate on. So if you have a cut down here in the groin you can actually move up with a small wire that is called a Catheter and with the Catheter you move up all the way and you go all the way to the heart. Then you can just use these small wires in order to open coronary arteries and in order to remove blockages. These can or even go up to the brain yeah so there are also dedicated operation theaters sometimes with two x-ray systems. Actually, it is then a pipeline system where they can also operate minimally invasive just with a couple of wires on the brain going through essentially all of the torso up into the head. There you then can for example in the case of a stroke you can remove a blockage that is actually preventing the blood from flowing into the brain and this can be taken out. So this is real-time imaging so there you have to be really quick with the processing because you have to display several frames per second on the display such that you can actually see where your wires are going and sometimes it’s very hard to see the vessels.
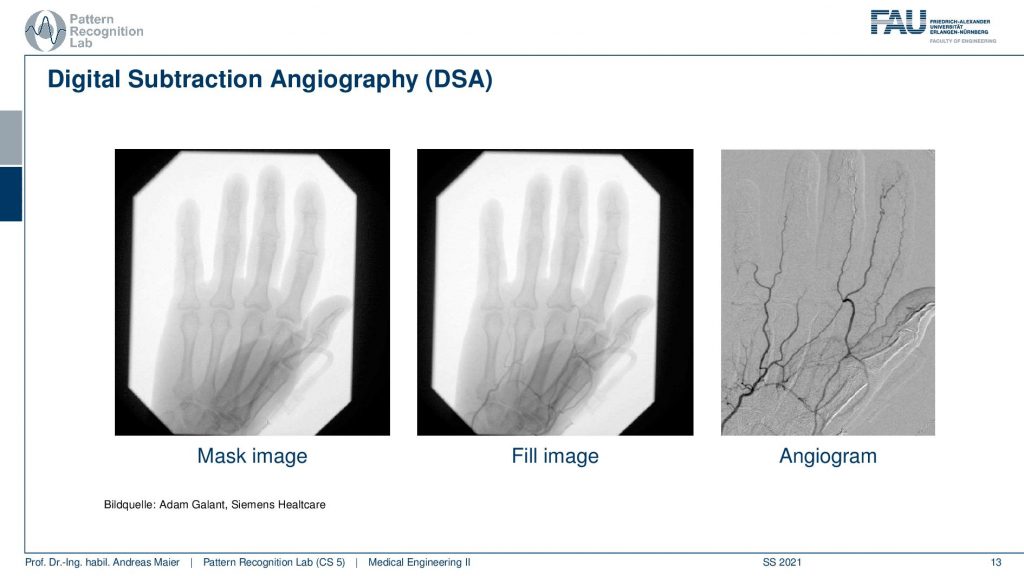
So there’s a trick to visualize them and this is called Digital Subtraction Angiography. So here you see a regular x-ray image on the left-hand side. What you do in order to visualize the vessels is you inject an iodine-based contrast agent. Now the contrast flows in and if you look very closely in the center image you can actually already see the vessels. But you see that the anatomical background here by the hand is so strong that you can barely see any of the vessels. But there’s a very cool trick that is called the Digital Subtraction Angiography. So you take the image in the center and then you subtract the image on the left. Just take in the same x-ray parameters and subtract the two and you get the image on the right-hand side. So this is called a DSA and this principle is very powerful because now on the right-hand side image you can see the vessels extremely well. So this technique is a mathematically very simple technique. But it allows you to spot differences between two images very very quickly. Imagine if you had that idea and you had a patent for it. Yeah, there are really patents out there for ideas as simple as that one, then you would probably not be just a very good researcher but you could also get quite a bit of money for inventions like that one. Remember what we are doing here is leading you towards a career in either science or industry by the way medical imaging both are very closely related because of course industry has to keep up with the newest developments in science. So they like also to cooperate in research projects and actually we do that at our lab quite often. You see that sometimes simple ideas like this one are out there and you can dramatically improve treatments get much better guidance with a simple trick as just subtracting two images.
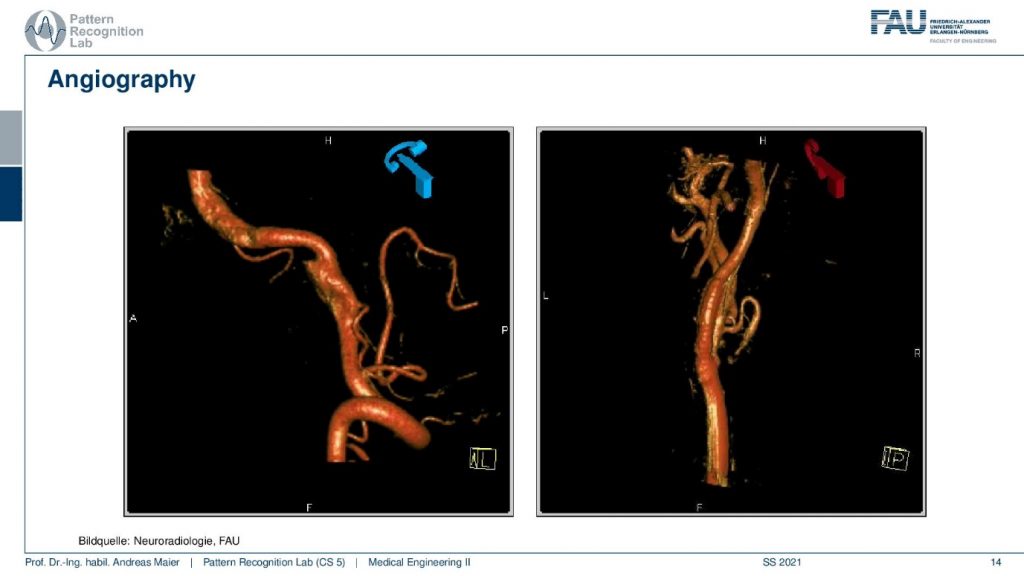
Now this is just the first step there are also 3d imaging modalities this is what we’ll talk about in a couple of seconds then you can also compute the 3d structure of the vessels and then you get images like the one I’m showing here. So here you can see that only the contrast agent is reconstructed in 3d. Let’s say you want to plan something, you want to have an insight on some very sophisticated vessel structure then you can reconstruct it. You can measure metrically in that image and then you can decide where to go next with your catheter and maybe you understand why you can’t take that specific corner with the wire you have on the table inserted into the patient. So this can be done in close to real-time only a couple of seconds a 3d image and you can improve navigation again drastically.
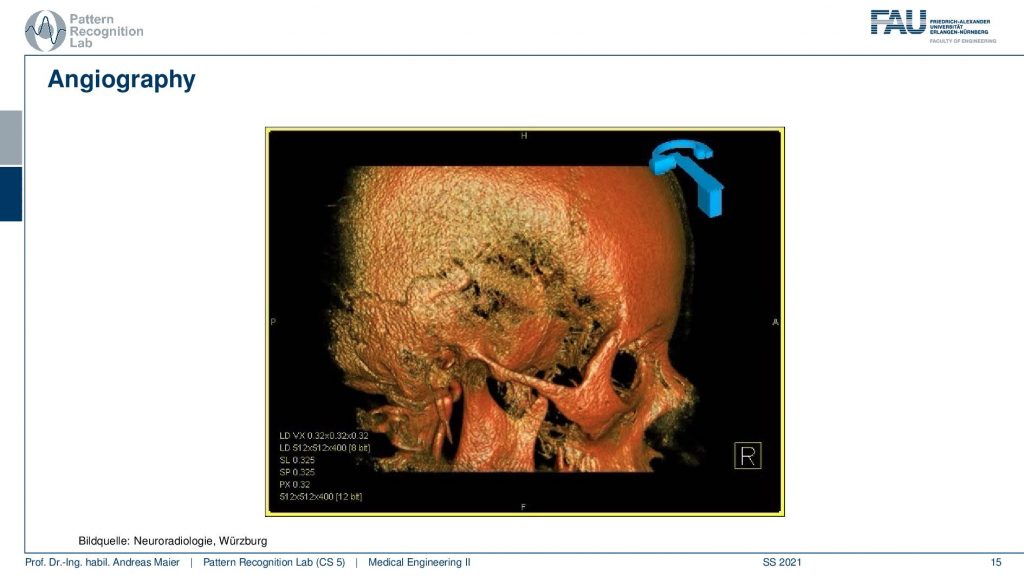
Also what’s cool about those angiography systems is that they have very high resolution. So they can also get very highly resolved images for example for high contrast structures like the skull as we’re showing here.
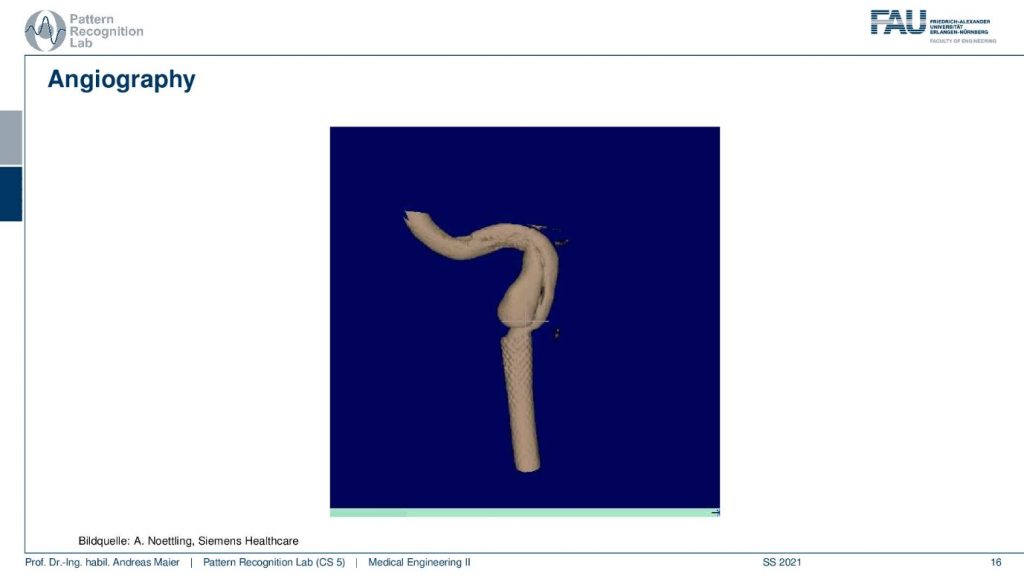
Of course, you can also do close-ups. Here you see the reconstruction of a stented vessel where you essentially introduce a small wire mesh. This wire mesh is then expanded inside of the muscle in order to keep a large diameter and in order to restore optimal blood flow. So this is done for example in stroke patients and also patients with coronary heart disease. So there you go into the vessel that is already narrowed and this then also leads to the problem that the heart is not properly pumping. As soon as you widen the vessel so what you do is you take a small balloon you push it inside and then you blow it up inside of the vessel and then immediately the blood flow is restored. Then you put in the small wire in order to keep it open. Patients that have this coronary disease often have trouble with you know they run out of breath even when they go up one flight of stairs. So they are in a very bad condition because the heart is not pumping enough and they are running out of oxygen. So physical labor is really really hard for them and you do this minimally invasive you go into the hospital then the intervention takes maybe a couple of hours. But some patients report that immediately after the surgery they feel better much better and so the patients that undergo this kind of therapy are typically very very thankful because they have a very high chance of recovery. Typically it’s only a matter of days that they feel better and with a minimally invasive procedure, you can get down to only two days in the hospital. Imagine if you would want to operate on the heart and you want to have bypass surgery or, something like that where you add a small piece of a vessel in order to replace the vessel that has been occluded that cannot transport the blood anymore. Then you have to open the chest you have to go to the heart and you’re at least six weeks in hospital. Because you really have to open the torso and this is really a very exhaustive surgery. Minimally invasive same recovery rates but only two days or a week in the hospital. So that’s really a dramatic improvement for the patient and also a dramatic improvement in terms of cost. So imagine you are six weeks in hospital. How much time and money that costs to treat the patient to care for the patient. He needs food and you know service and so on. If you compare that to two days that’s much much cheaper and by the difference of the cost, you can also then argue why you can pay for a very expensive technology like X-ray tubes in the operation theater and so on.
Even more sophisticated technology is Computed Tomography.
Here you have scanners like this one where you actually have an x-ray detector and source mounted on a gantry and they are rotating around the patient.
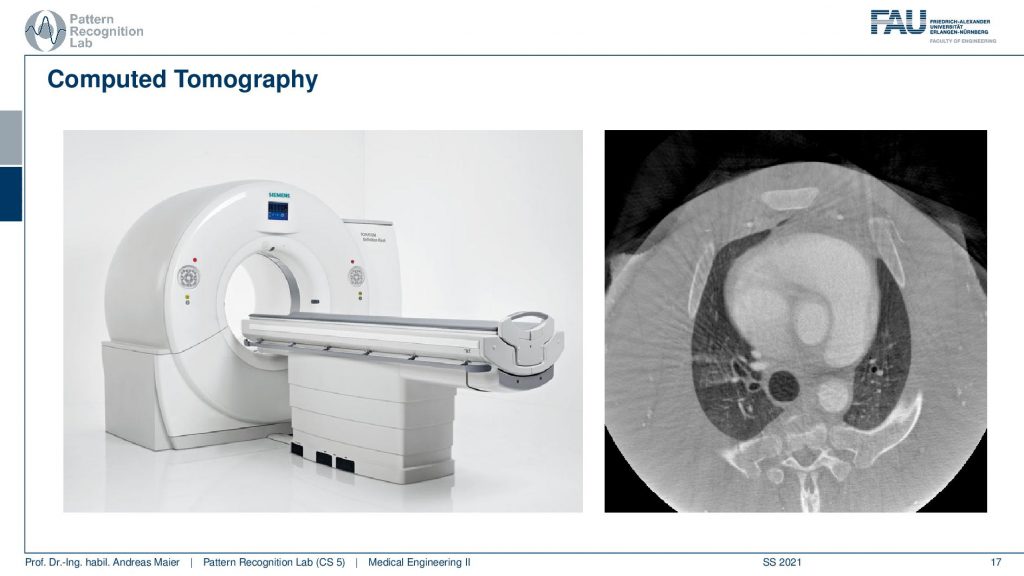
The patient goes on the table that you can see here on the left-hand side and you lay down and then you essentially are being scanned. So you get transported with the table through this donut appearing shape and this is of course the scanner and the donut shape is because there is this gantry rotating inside. Then you do x-ray projections from all sides and this allows you to reconstruct slice images like the one that I’m showing here on the right-hand side. So here you see a slice image this is a contrast-filled heart. You see some ribs on the top and you see the spine on the bottom. There’s this large black hole in the center of the image. So this is actually the air tube the trachea and then of course the contrast-filled heart. Then there are these two half-moon-shaped structures that are on the left and right-hand side so this is the top of the lung and you may wonder why this is a bit of strange anatomy and what you’re seeing here is actually not a human scan but this is actually a peak. So this is from an animal study and in this animal study, they were exploring the influence of different contrast agents and also different medications, and then in this kind of animal study, they were creating the image that they were showing here on the right-hand side. So you see that there is a multitude of different scanning devices and you’ve seen that we have only looked at a very small fraction of the scanning devices in this small video here. We will continue in part two of this introduction where we then also will have a look at different kinds of modalities that are of course suited for different kinds of diagnostic purposes. So thank you very much for listening to this video and I’m very much looking forward to seeing you in the next one. Bye-bye!!
If you liked this post, you can find more essays here, more educational material on Machine Learning here, or have a look at our Deep Learning Lecture. I would also appreciate a follow on YouTube, Twitter, Facebook, or LinkedIn in case you want to be informed about more essays, videos, and research in the future. This article is released under the Creative Commons 4.0 Attribution License and can be reprinted and modified if referenced. If you are interested in generating transcripts from video lectures try AutoBlog.
References
- A. Maier, “Introduction”, in Medical imaging systems: an introductory guide, edited by A. Maier, et al. (Springer International Publishing, Cham, 2018), pp. 7–12, 10.1007/978-3-319-96520-8_1
- A. Oppelt, Imaging systems for medical diagnostics: fundamentals, technical solutions and applications for systems applying ionizing radiation, nuclear magnetic resonance and ultrasound, (Publicis, 2006)
Video References
- Randy Dickerson – Syngo Via VB20 Cinematic Rendering https://youtu.be/I12PMiX5h3E
- Mayo Clinic – Animation Coronary Stent Placement https://youtu.be/I12PMiX5h3E